How Do I Polish a Pen? Celluloid Edition

EDITOR’S NOTE: Polishing a vintage pen can be a surprisingly dangerous exercise in vintage pen restoration. If you use the wrong method on the wrong material, you will ruin your pen. If you overdo it with the correct method and correct material, you will ruin your pen. We will not be held liable for any problems that arise from your efforts to polish your pens. This is simply an explanation of what we do and have found success with with on our own pens. We do our best to warn about some of the pitfalls but we cannot guarantee we have explained all of them. Results may vary.
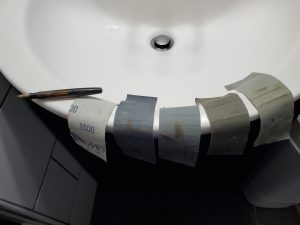
First gather your pen and Micro-mesh sanding cloths at your water source under bright light. You can see both the grit and cloth sides of these strips of various grits spanning 1500, 3600, 6000, 8000 and 12000.

This article explores wet sanding structurally sound celluloid pens by hand to a high-gloss shine. Never wet sand a pen made of hard rubber, especially if it has any sort of chasing design or imprint. Never wet sand a metal pen, either. Never try to wet sand a celluloid pen that is krazing or otherwise deteriorating, as you will destroy whatever is left of it. In this piece I take two heavily damaged Parker pens and restore their luster. However, before I got started on either of them, I examined them carefully to make sure they were free of that shattering plastic look called krazing and cracks in the barrel. A hairline crack in the lip of a cap is okay to wet sand, as long as you are very careful with it as you progress.

WHAT IS WET SANDING? Wet sanding is using different grits of specialty sand “paper” made out of cloth to first rough up and then smooth out the celluloid of a pen with some help from water.

I like using strips of a product called “Micro-mesh” cut into 2-inch by 6-inch sections. I use them in the grit levels of 1500, 3600, 6000, 8000 and 12000. Even if you only have one strip of each of those grits, it can last you dozens of pens.

WATER: You can use it two different ways. One with a thin stream of luke-warm water from a tap or the other way is in a large mixing bowl full of luke-warm water. The latter saves some water, and you can see just how crazy dirty plastic particles can get. Your hands are going to be in water for more than an hour, so you might want to wear some latex or rubber gloves.
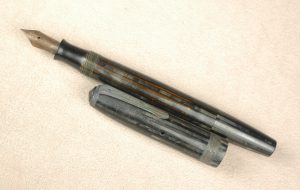
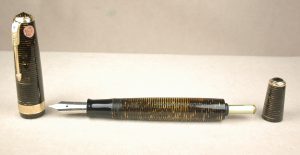
This is a Parker Duofold with a Vacumatic filler. It actually survived Hurricane Katrina nearly 20 years ago. It looks very tarnished and filthy and worn and awful.

HOW IT WORKS: The process to wet sand a pen to near perfection is simple but very repetitive and time consuming. You will want a well-lit area near your water source. There is much better lighting by my bathroom sink, so I make sure to have my 5 strips of Micro-mesh at the sink along with the pen I want to work on. I set a steady but thin stream of water at a temperature I find comfortable from the tap. Next I wet my strip of 1500-grit Micro-mesh. It doesn’t matter if you start with the cap or the barrel, but I like to start with the barrel because it takes longer.

With the Parker Vacumatic pens I have chosen, I take off the main cap but leave the blind cap tightly secured to the barrel. I also have already replaced the diaphragm. This way, if there is a little blind-cap misalignment after the repair, I might be able to smooth it out a bit.

As a right-handed person, I hold the section of the barrel in my left hand. I take the first strip of 1500-grit mesh in my left hand and wet it under the running water. To help keep track of where I am at, I start with the open nib of the Parker Vacumatic facing up. I extend the barrel under the running water and I make 10 complete cycles of rubbing with the mesh strip against the barrel from the section threads to the tip of the blind cap and back to the threads. The 1500-grit mesh is going to scrape off an entire layer of the celluloid, removing the minor scratches and imperfections. Be careful, as it might also remove the last of a shallow barrel imprint! What luster your barrel might have once retained will look horrifyingly dull and scratched. Now I rotate the pen about an 8th or a 10th of a turn and do 10 more cycles of rubbing under the water. You will want to check that the mesh overlaps the original first cycle’s path to make sure you didn’t miss a spot. Take your time and be thorough. Keep the barrel under the running water or in the bowl no matter what grit of mesh you are using. Let the sanding mesh pass through the water. This helps remove the scraped away plastic…and it keeps the sanding from doing more harm than good. Dry sanding can wreck the finish. Keep rotating and doing 10 cycles until the barrel has been uniformly sanded by the 1500-grit mesh.

After the first round of wet sanding is finished, I like to dry off the barrel to inspect the progress and make sure I didn’t miss anything.
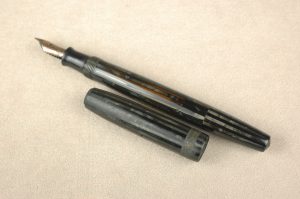
The hurricane survivor is halfway done. Notice the barrel is refreshingly shiny and clean compared to the untouched cap. Please notice the cap’s clip has been removed in preparation to wet sand the rest of the cap.

If everything looks evenly done, I take up my next strip of the mesh (3600 grit) and repeat everything I did the first time with the first strip. HOWEVER, now I do 20 cycles of sanding for each turn of the barrel. The reason is simple: That 1500-grit mesh really wrecked the celluloid and dug some deep sanding grooves into the barrel. 3600-grit mesh is half the strength of the harsher mesh and it take more effort to uniformly start cleaning up the damage from the first time through the process. Once you have uniformly polished the barrel with the 3600-grit mesh, dry it off and examine it.

Don’t be scared that the barrel still looks awful. Under that bright lights look for imperfections within the imperfections. The scuffed barrel will look even worse in a spot you missed. Imagine you just hired a local teen to mow your lawn. Before you pay this person, you check to see that they didn’t miss a spot or leave a thin strip of the grass that is much taller than the rest of the yard. Unlike a lawn that is easy to cut back down to size, a poorly wet sanded spot in the celluloid will only start to look worse, as the finer grits can’t fix what the harsher grits missed. As such, if you jump straight to the 6000-grit mesh, you might accidentally engrain a piece of the 1500-grit polishing portion that only the 3600-grit process can get out. If you find a spot you missed, just put that spot back under the water and give it another 10 cycles of 3600-grit sanding to see if that evens out the spot. Dry it off and check. Keep going until the spot looks uniform to the rest of the pen. You’ll mess up because you are new to it. It takes time and experience to catch the nuance of the sanding levels and how they look. If you get too ahead of yourself, just remember to go back to the stage you think you missed it at. It takes longer but you can correct the mistake.

If the 3600-grit polishing run on the barrel looks uniform and complete. Do it all over again with the 6000-grit mesh. ONLY THIS TIME, do 30 complete sanding cycles for each turn of the barrel. Again dry it off and inspect it for uniformity when you are done. Now it should look like you are making good progress. The finish will start turning from cloudy to glossy…like a fog is starting to lift.

When you are satisfied the 6000-grit work is uniform and complete, move on to the 8000-grit. Now make it 40 complete sanding cycles per turn of the barrel. If you are an impatient person, you might be tempted to call it “Mission Accomplished” when the 8000-grit efforts are dry and uniform. BUT, trust me, there is still a slight layer of haze in the finish of the celluloid.

The 12000-grit mesh is so smooth to the touch, even when dry, you might swear it isn’t gritty at all. However, once you’ve now made 50 complete cycles of wet sanding per turn of the barrel, you will be astounded once you have dried the barrel and made sure the work you did was uniform.
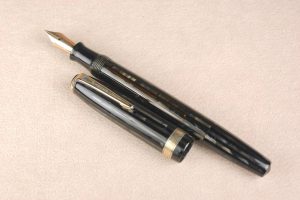
Here is the completed Parker Duofold. Notice the little blemish to the left of the clip. It was way too deep for the wet sanding to polish out of the cap.

Unless there are deep divots or scratches in the barrel, your barrel will now look like new. To help seal that finish and keep the pen shiny, I take just a tiny drop of mineral oil on a cotton rag and rub down the barrel. I then buff it with a dry cloth to remove any excess mineral oil.

With the barrel done, you can repeat this process all over again with the cap. Parker Vacumatics and “Duovacs” (slang for 2nd generation Parker Duofolds with vacumatic filling systems) are fortunate to have removable pocket clips. It is easier to wet sand a cap without its pocket clip. BUT, if you can’t remove the clip, that is okay. Just take your time and polish under the clip. Some people like to mask off the cap ring(s)  while wet sanding the cap. You can brass/remove the plating on the cap bands if you wet sand them. However, if your pen is so ugly that you have to wet sand it, it likely was never going in a museum collection to begin with. Personally, I find it is just easier to wet sand the bands and take the risk. Sometimes they come out looking like new or sometimes I strip the plating. In either case, they are shiny.

PRO-TIPS & TRICKS: Start with a pen that you can ruin and not worry about. As with any new experience, it takes time to perfect the technique and find the ways to grip your pen parts and mesh to maximize comfort and effectiveness.

Wet sanding a complete pen takes me anywhere from 45 minutes to an hour and a half. I save it for pens that are desperate for the tender loving care.

One of the things I mess up the most are the ends of the cap and barrel. It is soothing and easy to wet sand the middle of a cap or barrel. It is easy to forget to get all the way to the barrel threads or end of the barrel…or each extreme end of the cap. Sometimes before drying off and checking to see how I’ve done, I just go back and work around the ends a second time to make sure I got them right.

Vacumatics were made for this type of polishing. Other pens with more exposed metal parts require more effort to keep them safe. For example: A Sheaffer Balance Lifetime is a great candidate for celluloid wet sanding. You just need to take extra steps to protect it. By keeping this lever filler in water, the inner J-bar for the filling system will get very wet. There is no way to get around that. Sooo, when you finish your polishing of this barrel, shake out the water, dry it as thoroughly as you can with Q-tips and then set it so that a little fan can blow room-temperature air into it overnight. If you completely dry it out as quickly as you can, it won’t rust and cause other problems. Only after it is completely dry should you finish the restoration by resaccing it.

Hopefully, this will help you make some of your favorite vintage and modern pens look like new. Please feel free to ask questions. This system works well for me. I know other people who have their own ways of polishing their pens that are different from mine. There is always more than one way to accomplish a task. Best of luck.
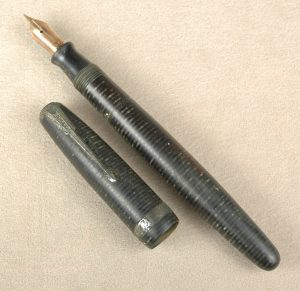
Here is a hurricane damaged Parker Vacumatic with nickel trim. It might look hopeless, but….
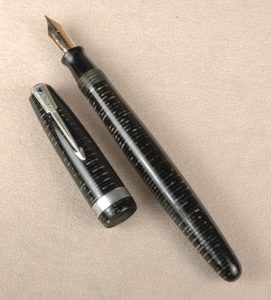
Wet sanding has renewed to finish of that poor hurricane ravaged Parker Vacumatic to make it look as close to new as possible.
Westenra Memorial: Stave II

EDITOR’S NOTE: This is chapter 2 of my on-again-off-again novel “Westenra Memorial.” You can read Stave I from last Halloween with this link.

Stave II

This photo of a spring peeper frog has nothing to do with this story. I’ve just been meaning to use it for years.

Shambling in through the front door of his simple ranch home, José was pale and trembling. Even though it was 5:30 in the morning, Rose was up and rushed to him.

“Is everything alright?,” she asked, concern heavy in her voice. “You look terrible.”

José held her tightly. “I think we’re in real trouble, and it is all my fault. I’m so sorry. I had no idea.”

He was practically in tears, and she had never in all of their years together seen him cry.

“It is going to be okay,” she tried to assure him. “What happened?”

“I can’t tell you,” he explained, barely able to make eye contact. “I promised on our children’s lives.”

“It’s not MS13, again, is it?”

“No. They think I’m dead, and we made it pretty convincing.”

“Is there something I can do to help?” she pleaded.

“I don’t think there is.” He looked gaunt, almost a little desperate, as his eyes flit from object to object in their house, as if he was taking one last look at their lives.

“Dr. Tepes really likes you,” she reminded him. “Perhaps he could help.”

José laughed a little nervously. “No, and I don’t think he is who you think he is.”

“Are you kidding?” she asked. “He’s only the nicest human ever to have lived. He saves lives all of the time. He speaks Spanish to all of his Spanish-speaking patients. Sometimes all he charges is a home-made tamale. There isn’t a racist or sexist bone in his body. He works with the homeless. He’s great with children. He might be white, but if he were to spout off ‘All lives matter,’ he’d be the only person I know who really means it without a trace of irony.”

“No,” José said sternly, holding his wife by her biceps, eyes resolute and looking deeply into her’s. Now she was scared, not of José, but of whatever was troubling him. “He is not who he pretends to be, and you and the kids are to go no where near him.”

José paused, his face quizzical. “Have you ever actually seen him eat a tamale…or anything for that matter?”

“I don’t understand,” she said. “What did you see? Did he hurt somebody?”

“I cannot explain,” he said, embracing her, again, this time quite tenderly, as he whispered. “I am sworn to secrecy. And, no, I did not see him hurt anybody, but he has hurt a great many people. We cannot trust him, and, yet, we have no choice but to trust him.”

It was now after 6, and his sons came bounding into the living room to greet him. José hugged each of them as if he hadn’t seen either of them in a decade. It was his favorite time of day and theirs, as he came home from work and got them ready for school.

Still holding his sons, José looked at his wife, “You know I don’t really believe in that mumbo jumbo you do, but if ever there was a time to ask for protection, this is it.”

She folded her arms under her impossibly perky breasts and looked at him peevishly. “Do you really think I’d still look like I did the day we met, after two children and 25 years of marriage if it was just mumbo jumbo?”

He blew her a kiss, and she winked back and walked, hips swaying, to her hidden sanctuary behind French folding doors.

“Santa Muerta,” she called, lighting candles on the walls and altar, as José took the boys to the kitchen to make them breakfast and hear about their previous day in school.

How Do I Restore A Parker Vacumatic

This is a new old stock Parker Vacumatic Maxima in the “Golden Pearl” design. Check out the barrel clarity!

When it comes to vintage Parker pens, Parker Vacumatics are my favorite. I love their stunning art deco designs and over-complicated filling system. The pens have some quirks, too, but, I still love them.

As the Roaring Twenties came to a close, the Parker Pen Company knew it had to build on to its huge success with the Parker Duofold fountain pen or risk losing momentum in a very competitive writing instrument marketplace. Kenneth Parker, son of the company founder George Parker, figured the answer to this problem was a sac-less fountain pen that held more ink than most any other pen on the market. The key to the new pen would be a vacuum pump that used a rubber diaphragm invented in 1928 by Arthur Dahlberg. It was a device that Sheaffer, Waterman, Conklin and Wahl-Eversharp turned down. That device would be the foundation of a pen Parker first released to the public in 1932 as the Golden Arrow. Yet, the company would soon rebrand it the Vacumatic.

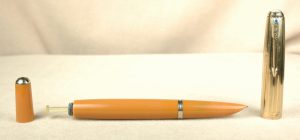
More than a Vacumatic-filling Parker 51, this is the rare, legendary “yellowstone” color in like-new condition.

During the next 16 years, Parker would feature the Vacumatic filling system in 3 of its most famous pens: the Vacumatic, the 2nd generation Duofold and the Parker 51. If you get into vintage pen collecting, odds are really good that you’ll encounter numerous “Vacs” that need repair. Restoring these pens is both easy and complicated. It really just depends on how lucky you get.

Parker Vacumatics and 2nd generation Duofolds with Vacumatic fillers (sometimes called DuoVacs) were made of celluloid. Celluloid is a beautiful plastic but it ages inconsistently. Some Vacs are as strong as they day they were made. Others that were exposed to prolonged heat might be brittle. In my own very non-scientific experience, I find that the “grey pearl” models of Vacumatics are often very fragile. Soaking the celluloid too long in plain water can damage a pen. ANNNND, for the love of all that you hold dear, keep celluloid pens away from open flames. When celluloid catches fire, it burns fast and hot, like a traffic flare. How do I know? One of the original fountain pen repair books said that one should heat a pen up over an open flame to make it easier to open. I did just that, when I was still learning, and holy cats! I had to leave the damned flaming pen at the bottom of a steel sink filled with water before it would finally go out. NEVER USE AN OPEN FLAME. Turns out hair dryers work just fine.

Vacumatic enthusiasts divide these pens into 3 generations. It is vital to know which generation pen you are working on. 1st Generation pens have a lockdown vacuum tail filler and often an integrated section and barrel. As such, you can’t always unscrew the section from the barrel, as you would the 2nd and 3rd generation pens. Plus, when removing the filling unit, you must first unlock the plunger so it is fully extended. Attempting to remove the filling unit with the plunger locked down will destroy the plunger and filling unit. (Authentic replacements are very hard to find.) 2nd Generation pens still have an aluminum plunger but no lockdown device. They usually have a section that unscrews, too. 3rd Generation pens have a plastic plunger and unscrewing sections. These were World War II production models, and aluminum was rationed.

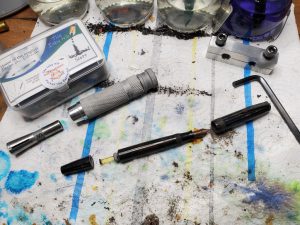
On the left is the Vac Extractor Tool and to the upper right is the “stocks” style Vac unit tool. A Parker “DuoVac” awaits them below.

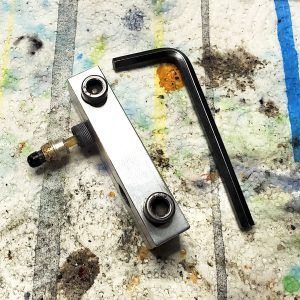
Unlike most pens which can be restored with the same tools, Parker Vacumatic pens need a special filling unit tool that helps you to remove and return the filling unit into the tail of the pen. I use two different types depending on the challenge of the job. My favorite looks like a medieval stocks with two different size (threaded) holes and is tightened with screws and an Allen Wrench/hex key. The small hole is for debutante and standard/major-sized filling units. The larger hole is for the oversized Maximas. I generally prefer it, as it makes resetting the new unit with a lubed diaphragm a little easier. The other design that I like was invented by Scott Pauley at The Inky Nib. He calls it the Vac Extractor Tool. Unlike the stocks tool that I normally use, this tool has the tightest threaded grip imaginable on the filling unit. My “stocks” just can’t get a tight enough grip on maybe 1 in 20 filling units. That is when I break out the V.E.T. to get the job done. Very clever design, fairly easy to use.

For today’s demonstration of Vac repair, I have chosen a 1945 Parker Duofold with a vacumatic filler. As with the 3rd generation Vacumatics and early Parker 51s, it has the plastic plunger unit. It also has a section that you can unscrew.

As usual, I start by soaking the nib and section with water just deep enough to cover the barrel threads for an hour or so to leach out the old ink and help loosen the section. An hour is usually safe enough not to damage the celluloid with the water emersion.

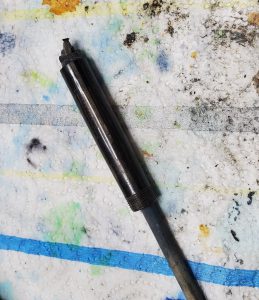
This is a close-up of the extracted filler unit in the stocks.

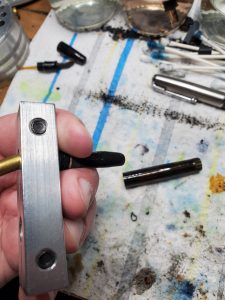
After drying off the nib and section, I test to see if I can unscrew the section with section pliers and just a few seconds of heat from a hair dryer. If I can get it started, I leave it for later. Then I thread the filling unit into the stocks and tighten up the stocks. Next I take the hair dryer and apply a few seconds of even heat around the celluloid tail of the pen. I grip as much of the barrel of the pen as I can in one hand and then slowly apply pressure turning to the left with the stocks. I am lucky with this pen that the unit unscrews fairly easily. If it fought me, I would apply a little more heat at a time until it finally gave way.


Watch how the wooden dowel pushes up through the section side of the barrel to remove the old diaphragm from the barrel.

After the tail-end is open, I then unscrew the section with the nib and feed all still in place. The reason that I don’t unscrew the section, even though I’ve loosened it, is that I want the added strength and stability of the celluloid at that end of the barrel while pressure is being applied to the tail end. The tail end experiences more torque and a little more fragile than the section end. I don’t want to accidentally squeeze the barrel too hard so that I crack the open end.

Sometimes the threaded black-plastic portion of the filler unit comes out, but the plunger portion remains stuck inside the tail. Sometimes the remains of the decaying rubber diaphragm remain stuck in the tail of the barrel. In these situations, I use a wooden dowel to remove them. After the big parts are out, then you need to use a dental pick or some other device to make sure all of the old diaphragm is out. You want to be especially careful with the barrel’s inner threads.

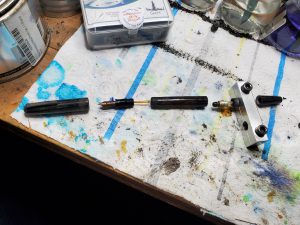
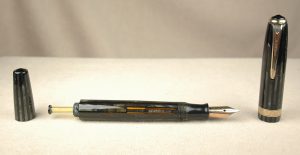
Here is the “field stripped” view of the pen. Note that I do not disassemble the section, nib, feed and breather tube. They are all perfectly happy in place 90+% of the time.

Once the pen is disassembled, the real cleaning begins. There is a trend lately among new vintage pen collectors/repairers online to prove their street cred by also knocking out the nib and feed from the section. This is entirely unnecessary the overwhelming majority of the time and risks breaking things that are perfectly fine as they are. At this point, I just dunk the still fully assembled section in the sonic cleaner along with the cap and barrel. It usually takes fewer than 5 minutes of cavitation to get them clear of old ink and debris. When you are done, dry it all off. I like to buff up the 14k gold nib…if I am not at risk of removing any two-tone plating…apply a little “Super Lube Silicone O-Ring Lubricant” to the section threads and screw it tightly on to the barrel again.

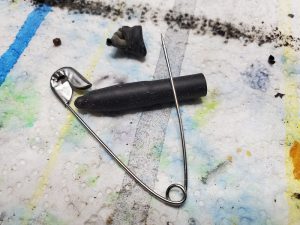
Can you see the little pellet ball in the top of the plunger from this view?

At no point did Parker actually use any glue on these pens. However, over the years, various repairmen did use glues and shellacs. That brown crud on the bottom of the plunger three photos up from here is old shellac. I scrape it off with a razor. (Please note that I leave the filling unit in the stocks for the duration of the restoration process. This helps me to make sure the proper depth is achieved when I screw the unit back into place so that the tail cap and barrel will realign properly.) Then I try to carefully remove the pellet from inside the plastic plunger’s cup. It was really difficult to get a good photo of that annoying little ball. The goal is to minimize damage to the cup of the plunger. I recently discovered there is a man in the UK who make a dremel-friendly drill system to drill out the pellets, but I have not yet tried it. Typically, I use a pin to try scooping out the pellet. It deforms the cup a little, but I try to pinch the cup back into shape when I am done.

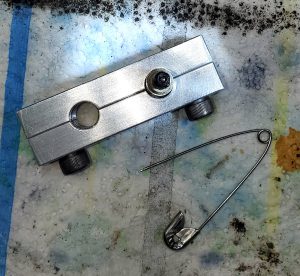
Trim the diaphragm at roughly the point you see where I’ve lain a pin over it in the photo. New diaphragms are usually way too long to work properly. It is vital that the diaphragm can be stretched with the plunger to the point where it almost touches the breather tube inside the barrel. However, if it is so long that it impedes the function of the breather tube, the pen won’t fill or empty properly.

Inside the diaphragm is a new pellet. To start reassembling the filler, you will need to carefully get that rubber dip end of the diaphragm with the ball/pellet in it into the cup of the plunger. Once the diaphragm is secure in the cup of the plunger, you are going to hold the diaphragm in place and push the plunger up through the center of the diaphragm and invert the diaphragm from its original starting position. Once you have the original open lip of the diaphragm rolled down over the plunger, pinch it with your fingers to that metal cone part that I used a razor to scrape the shellac off of. Also make sure the same cone is held into the black-plastic threaded part of the filler unit so that the plunger is fully extended by itself without the rest of the parts joining it. This is tricky and likely doesn’t make any sense until you actually do it for yourself. While the unit is is pinched and the plunger and diaphragm stretched fully, dab some of that silicone lubricant all over the diaphragm. Finally insert the lubed up mess into the tail of the barrel. Make sure to twist the barrel back and forth so the stretched diaphragm doesn’t get stuck on the sides. Don’t release the pinched cone until it is as deep into the tail as your fingers can let it be. It should snap onto its seat when you release it. Finally, you can screw the black-plastic threads back into the barrel. If all goes well, the unit it will feel tight right where you started at. However, even when things go well, sometimes they don’t stop where you started. NEVER overtighten the filling unit. If it starts to snug up early, that’s okay. Sometimes, you might have to unscrew the stocks and reset them a little higher to finish tightening a little deeper than before. It is far more important to get the right snugging of the unit, as the unit holds the diaphragm lip in place while the plunger creates a vacuum with the rest of the rubber. If you overtighten, you can blow out the entire barrel and make it inoperable, ruining the pen. If you don’t get a tight enough closure, the diaphragm will get loose and not work. Don’t worry if the blind cap doesn’t align as perfectly with the barrel as it might have done.

At this point, it is safe to try test filling it with water. Remember it takes 10 to 12 pumps to fill it all the way. If everything looks like it is working okay, the only thing left to do is to polish it to a beautiful luster. Personally, I think wet sanding works best on Parker Vacumatics, 2nd Generation Duofolds and 51s. Tune in this November for our wet sanding tutorial.

Here is our fully restored Parker Duofold from 1945. That wet sanding really makes it stand out

Don’t Get Fooled by Fake Montblancs: Greta Garbo

One of the greatest screen beauties in golden-era Hollywood was Swedish-born Greta Garbo. She expressed a bold, raw sexuality uncommon in America in the 1920s and ’30s, and she maintained a famed “mystique.” Unlike so many who sought fame, Garbo famously said, “I want to be left alone,” though she was often misquoted as “I want to be alone.”

Her greatest films include the 1926 silent film “Flesh and the Devil;” “Mata Hari;” “Grand Hotel;” “Anna Karenina;” and my favorite, the Billy Wilder comedy “Ninotchka.” Garbo rarely smiled in her films, and the tagline for “Ninotchka” was simply, “Garbo laughs.” Considered a serious dramatic actress, Garbo is an absolute scream in the screwball comedy “Ninotchka,” where she plays a seemingly emotionally distant Soviet agent in Paris trying to sell stolen “White Russian” jewels to fund the communist regime when she is pursued by an unscrupulous playboy played by Melvyn Douglas. Easily one of the 10 funniest movies ever made.

Not surprisingly, Montblanc was quick to chose Garbo as the inspiration for one of its first…if not the first…Muses series limited edition pens in 2005. Celebrating the greatest female entertainers of the 20th century other muses include Ingrid Bergman, Marilyn Monroe, Liz Taylor and Maria Callas, among others.

As an early, and very desirable collectible, the Montblanc Greta Garbo is often faked. And those fakes can be surprisingly good. On first glance, the one we found can be easily mistaken for the real thing.

Here is a fake Montblanc Greta Garbo we discovered in a collection of pens.

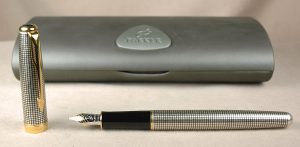
It is easy to Google images of the Montblanc Greta Garbo set to see the original boxes and papers. (We thought we had and sold a set a little while back with photos of our own, but we cannot locate them.) The real pen has a unique serial number and Akoya pearl on the clip. The trim also is also silvery not golden. Authentic pens are also more solidly made.

The fake Garbo pen that we found looks real, but it feels flimsy and squeaks when you unscrew the cap. The clip and the golden trim are also rather loosely attached. You can feel the edges of the trim in the fake versions and maybe even wiggle the metal. The fakes likely also come with a generic converter or oddly imprinted converter with nontraditional Montblanc fonts and logos.

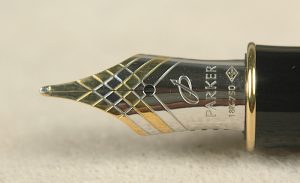
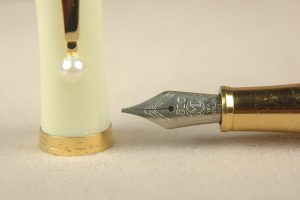
This close-up shows the poor quality of the fake pen’s steel nib, along with the condition of the “pearl” and trim.

In the close-up photo of the fake nib, you can see it is obviously a steel nib with an imprint that looks real. If you aren’t sure if the nib is steel or rhodium-plated, a test scribble will generally reveal a poorly made, scratchy steel nib.

Although we don’t presently have any photos of the authentic pen, we hope this helps to showcase the things to look for in the fake versions of the Montblanc Muses Series Greta Garbo fountain pen.

Parker Pen Heists

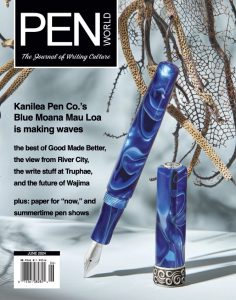
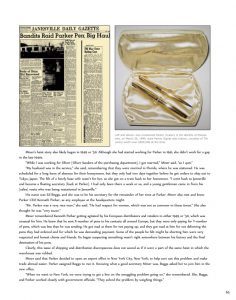
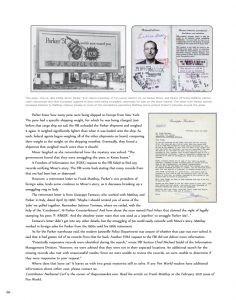
It has been a little while, but I have a new story in Pen World Magazine! In it I uncover not one but TWO pen heists that targeted the Parker Pen Co. in the late 1940s. This story is reproduced here with permission from Pen World. Please click on the individual images to see the story close-up. Please also use the QR code at the end to subscribe to Pen World Magazine.


Examining Noodler’s Ink Part II

For your writing pleasure, we have tested 10 more Noodler’s-brand inks. In Part I we delved into the various controversies, merits and problems with Noodler’s Ink. To read about that, please click on the Part I link.

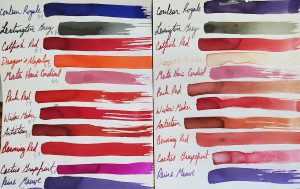
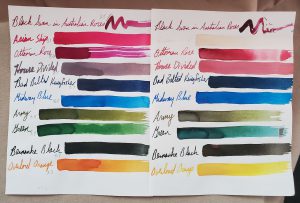
10 Noodler’s inks are on display here as a color-fast testing measure. The sheet on the left has the test proof that was stored in darkoom. The page on the right shows how some of the inks faded after 9 months in the sunlight.

Today’s ink spent 9 months in our sunniest window for a light-fast test. We also tested them for a pH reading, to verify or deny Noodler’s claim that all of its inks are pH neutral.

Let’s start with the color-fast (or light-fast) testing. It is always interesting to see what colors fade. “Black Swan in Australian Roses” is a red-black color that held up really well under prolonged UV exposure–hardly any fading or change in color. “Asian Ship” is a stunning deep pink. Unfortunately, it faded to nearly invisible. “Ottoman Rose” is a lovely purple with dark undertones. However, it fades rather badly in sunlight to a red-brick color, though shaded lines fade almost completely.

Another American Civil War-themed ink is called “House Divided.” It s a gray ink with some blue-ish undertones. On our Rhodia test pad it seemed to be surprisingly feathery. When it set in the sun for 9 months, it faded to a pale reddish pink…a fitting change for an ink based on the bloodshed of the war.

The blue inks we tested are surprisingly strong. “Bad Belted Kingfisher” is a nice dark blue that some might say borders on blue-black. It definitely doesn’t seem to lose an ounce of color. “Midway Blue” is one of the many World War II-themed inks. It is a bright, medium blue, which also doesn’t seem to fade in the sun.

“Army” green has a certain camouflage flair as an earthy yellow-green that is more green than yellow. UV light tends to fade out the yellow parts, leaving behind a darker green.

“Green” is close to an emerald green color at the start. UV light fades out its yellow properties and leaves behind a darker, bluer green.

Ben Bernanke was the chairman of the Federal Reserve for 8 years, overseeing the worst of the Great Recession. The owner of Noodler’s Ink seems rather obsessed with the guy and has, I think, created several Bernanke-themed inks. We tested “Bernanke Black.” It is a nice black when fresh. UV light fades it a bit to brown.

Whereas yellow is what faded out of the green inks above, the red is what fades out of “Overlord Orange,” another WWII ink. After prolonged exposure to the sun, the pumpkin orange fades to a paler yellow.

For those, like me, who haven’t taken high school chemistry in more than 30 years, the pH scale runs from 0 for the most acidic to 14 for the most base/alkali. A 7 is pH neutral, like distilled water. Aside from “Asian Ship,” most of the inks don’t stray especially far from pH neutrality. Here are our results, after we calibrated our testing equipment.

Noodler’s Ink                                  pH Result:
Black Swan in Australian Roses    8.5
Asian Ship                                            3.1
Ottoman Rose                                    8.6
House Divided                                    8.5
Bad Belted Kingfisher                      7.3
Midway Blue                                       8.5
Army                                                     8.4
Green                                                    7.7
Bernanke Black                                  8.7
Overlord Orange                               7.3

Please remember that the pH doesn’t necessarily mean anything with regard to how it will behave in your pen. It is a raw data point. How it will blend with the chemistry of your ink sac, converter plastic and seals is an entirely different matter.

Mark Twain’s Conklin Crescent

Samuel Clemens, better known as Mark Twain, owned this house with his wife Livy in Hartford, Conn.

Way back in 2013 I wrote a post called “Was Mark Twain the First Pen Pitchman?“. It was the oft repeated story about how author Samuel Clemens, who wrote under the pen name Mark Twain, advertised his support for the Conklin Crescent back in 1903. Clemens is best remembered for his novels “The Adventures of Huckleberry Finn” and “The Adventures of Tom Sawyer.” Plus there is the more relevant-than-it-has-been-in 100 years “The Gilded Age.”

I wouldn’t normally revisit an old post, but I just went to the Mark Twain House & Museum in Hartford, Conn. It is a beautiful house that he had custom built with his wife Livy (Olivia). Although Clemens was a noted writer and wit when they married in 1870, Olivia was the source of their wealth–the daughter of a prominent timber and coal baron. Their house in Hartford was built soon after their marriage. Remarkably, the young man who painted their foyer was none other than Louis Comfort Tiffany!

Clemens would write both Huck Finn and Tom Sawyer in that house.

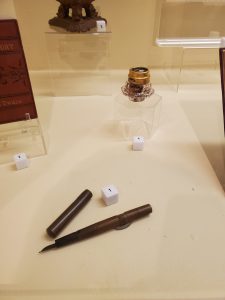
At the bottom of the photo you can see the Conklin Crescent fountain pen that Mark Twain called his “profanity saver.” Above it to the right is his inkwell.

Among the many artifacts on display was the great author’s actual Conklin Crescent fountain pen. I am not sure what model it is. Yet, I was a bit appalled by its condition. Chunks of black hard rubber were missing from the barrel threads. It definitely isn’t in a condition to be restored to working order and safely used. Nevertheless, it was great to see the actual pen that is so frequently written about and rarely photographed.

If you find yourself in Connecticut, it is worth the visit to this museum. The house is very well preserved, and I certainly learned a ton about the author and his family.

Plus, his next door neighbor was Harriet Beecher Stowe who famously wrote “Uncle Tom’s Cabin,” a critical look at American slavery that helped to promote the abolition movement. Her house is now a museum you can explore, too!

How Do I Restore a Sheaffer TouchDown

Fixing a Sheaffer TouchDown filler can be easy with a little practice. Personally, I love the functionality and simplicity of the design that uses pneumatics to collapse an ink sac and allow its natural vacuum to draw ink back into the pen.

Most of what you need to fix a Sheaffer TouchDown filler is right here in this photo.

In the first photo, you will see almost all that you need to restore a Sheaffer TouchDown filler. We forgot to include a bottle of “Super Lube: O-Ring Silicon Lubricant.” In case you have trouble seeing the photo, you will need: a Sheaffer TouchDown-filling pen, a long-shaft flathead screwdriver, dental pick, scissors, razor blade, a size 15 latex rubber ink sac, an O-ring, sac shellac, rubber cement and jar of room-tempeture water. A couple of Q-tips, paper towels, corn starch and a wooden dowel might also be useful.

To get started, unscrew the cap from the fountain pen, and stick the pen nib first in water. You do not want to soak the entire pen in water, just up to the division between the section (finger-grip part) and the blue barrel of this pen. Let it soak for anywhere from an hour to overnight. This leaches out most of the old ink and softens any possible glue a past repairer might have used to secure the threaded section to the barrel.

Once the pen is finished soaking, dry it off with a tissue or paper towel. Frequently these pens can unscrew without any assistance from section pliers. Grip the section (finger grip) between your thumb and forefinger on one hand and the barrel with your other hand. Unscrew the section with a steady, gentle pressure counterclockwise (lefty loosey.)

When the section unscrews, you will see the “sac protector” and inner remains of the ink sac come out with the section. The sac protector is friction fit, and you can remove it simply by pulling straight back. Some times the old ink sac has petrified and stays on the section nipple. Sometimes it is in pieces inside the sac protector. Sometimes the old sac has melted to the inside of the sac protector. The first two scenarios are very easy to manage. The melted sac takes a long time to remove. Q-tips, wooden dowels or anything else you can use to safely scrape the inside of the sac protector clean will help. It is very important to remove all the debris from inside the sac protector to allow the new sac to slide in and operate properly.

This photo shows a complete disassembled Sheaffer TouchDown pen.

After you have finished with the sac protector, unscrew the blindcap on the tail of the pen barrel and, if possible, pull the blind cap back as far as it will go. (Don’t force it if it is frozen inside the pen.) Now take the long-shaft flathead screwdriver and ease it up the barrel until you can feel the screw at the end of the barrel and metal tube. Turn the screwdriver slowly until you feel it find the slot of the screw. Hold the blind cap tightly with one hand and gently unscrew the screw to the left. You will feel the screw come free. It seems easiest to let gravity help it fall out on to your work bench. With some gentle pressure, the plastic blind cap will pop off the metal tube. Next, you push the tube back down and out the section-end of the barrel.

Until you get used to it, the trickiest part of the restoration is replacing the latex-rubber O-ring in the blindcap-end of the barrel. You can see the black O-ring imbedded in a groove of the barrel in this photo. If you are lucky, the O-ring will still have a little pliability and it will come right out with the help of the dental pick. If you are unlucky, the O-ring will have petrified, and you’ll have to carefully dig it out little piece by little piece.

Once the old O-ring is out, you might want to use a Q-tip to clean out any dirt in that end of the barrel. The barrel on TouchDowns are often still quite clean, and cleaning it with a Q-tip might not be necessary.

You can see the old O-ring inside this Sheaffer TouchDown barrel. Use a dental pick to carefully remove the old O-ring.

Sheaffer TouchDown fountain pens used one of two different size O-rings. Most pen-part suppliers list them as either a “small O-ring” or a “large O-ring.” Large O-rings were only used in first-year Sheaffer TouchDowns (1948), which have noticeably thicker barrels than the remaining “Thin Model” TouchDowns (1949-1952), which use small O-rings. If you ever feel like dabbling in Sheaffer Snorkels, the large O-rings are also used on PFMs and Snorkel Desk Pens.

I find it is easiest to place the new O-ring into its groove with the dental pick. I fold the O-ring a little and insert it into the blind-cap opening. Then I use the dental pick to carefully get one side of the O-ring into the groove. If all goes well, I use the dental pick to drag the opposite end of the O-ring into the groove. With two-points in the groove, I go the next high point of the sack and work it into the groove. Once that is accomplished, I try to get the last high point of the O-ring into the groove. It sounds easy, but it takes some practice to do it quickly. NEVER lube the O-ring before trying to install it. A slippery O-ring will make your life miserable.

Now it is time to start reassembling the barrel apparatus. Clean off the metal tube you had to unscrew from the blind cap with a paper towel to get any old shmutz off. Then drop the screw threads-first down the tube. Use the screwdriver to help find the tube’s hole for the screw. Leave the screwdriver in the tube slotted into the screw. Put a thin layer of silicon O-ring lube around the shoulder of the tube on the screw-end of the tube. Then insert the screw and tube, screw first, into the section hole of the barrel and gently glide it with the screwdriver all the way through the blind-cap side’s hole in the barrel until the tube won’t go any farther. Rest the barrel and tube on its side with the screwdriver still slotted into the screw.

Take the plastic blind cap and fill its cup with rubber cement. (There should be a rubber washer in there, but often it is blown and the rubber cement acts as a sealant that can replace it.) You might find a way that works better for you, but I hold the blind cap with the rubber cement in my left hand and pick up the barrel assembly by the screwdriver with my right hand. It gets a little messy, but I then screw the screw into the blindcap. You know you have found the screw hole in the blind cap when you see the tube going into the blind cap’s cup and rubber cement starts smooshing out. It is important to make sure the screw is in tightly, but you have to be very careful not to overtighten the screw because it can split the blind cap in half and make it useless for the necessary air seal to make the filler work. It is important for the tube to be extended all the way to prevent the rubber cement from getting into the O-ring. Wipe the excess rubber cement off with a paper towel. Now you can work the tube back and forth to spread the silicon lube around the O-ring and get smooth operation from the barrel assembly.

Here you can see where the hardened ink sac has been scraped off to reveal the nipple underneath.

Getting back to the section assembly part of the pen, take the razor and clean the usually hardened old ink sac off the nipple of the section. Be very careful not to accidentally chip off a piece of the nipple. That will ruin your pen. Some people will insist you need to give the nib assembly a sonic cleaning at this point, but if you soaked it long enough, you likely already removed most of the old ink.

To move forward, you need to trim your ink sac to fit perfectly into the sac protector. I don’t have a definitive way to do this. I usually stick the sac (closed end first) in the sac protector, pinch it at large opening of the sac protector, pull out the sac from the protector while maintaining the pinch and then trim it with scissors. Make sure the nipple on the section is dry. Put the sac on the nipple and then put the ink sac protector over the sac to see how well it fits. If the sac is a shade too long, trim it just a bit more. If the sac is a millimeter or so short, that is perfectly fine. Remove the sac protector and then ink sac. Paint a thin layer of sac shellac on the nipple of the section and then replace the properly trimmed ink sac. Wipe off the excess shellac and let the assemble dry for a few minutes. Next rub down the ink sac with pure talcum powder (old skool and potentially cancerous, as talc is mined with naturally occurring asbestos) or corn starch. The corn starch (or death talc) helps preserve the rubber. Snap the sac protector into place over the sac.

Final assembly is easy. Screw the section back into the barrel in a clockwise (righty tighty) fashion. Some old manuals say that you should put rubber cement on the threads (you can see the remains of old rubber cement on the starting photos) to help seal the barrel, but it isn’t necessary and only gives future restorers a bigger headache. The threads seal the section and barrel nicely on their own.

At this point, you have a pen that is ready to write. I, generally, give the pen 24 hours to let the shellac set completely. Then I test it with water, flushing out any remaining old ink while making sure it fills properly.

If you want it to looks its best, you can do a wet sanding that will remove a thin layer of the plastic, removing most surface scratches and stains. It also can enhance the color a bit. Unfortunately, it also makes the remaining imprint shallower or removes it entirely, which is a reason to be judicious in deciding which pens to wet sand. Yet, how to wet sand a pen is worthy of an article on to itself.

How Do I Write an Interview Thank You Note?

Sending a thank you note after a job interview is an excellent way to help yourself get ahead in this world.

It can be difficult to stand out in the job market, but one great way to get a little extra attention is to send a hand-written thank you note after you have an interview.

People so rarely get a hand-written card or letter these days that it is often a welcomed surprise. It also shows a prospective employer that you are thoughtful, considerate and genuinely interested in the job.

Selecting a card is usually pretty easy. You can find thank you notes available at dollar-type stores, grocery stores and Hallmark stores. Be sure to find ones that are glitter-free and not waxy, so you can use your favorite fountain pen. Not only is glitter deadly to your favorite nib, people–especially in a business environment–really hate getting it all over their hands, clothes and desk. Glitter just never lets go and can seemingly hang around for eternity. For the design of the card, keep it simple and business-like…not too frilly.

Writing the message is the easy part. Take your time and use your best penmanship. Address it to the person you interviewed with who will most likely be making the decision to hire you and be your boss. In the first sentence, thank them for the interview, while reminding them what position you applied for. Then personalize it by saying something nice about your discussion, referencing a specific moment during their interview that you hope they remember. Start wrapping up the note by stating your desired outcome for the interview. Close with “Sincerely,” and by signing your name under it.

Below is an example for a rather amusing job. You might want to write a slightly more serious thank you for a more serious job.

Dear Ms. Fowler,

Thank you for letting me interview for the position of whoopee cushion injection-mold supervisor at The Wacky Factory. I had a gas demonstrating my expertise at whoopee cushion inflation and activation. I look forward to your decision and hope to be working with you soon.

Sincerely,
F. Artemis

Holiday Shipping Deadlines

A field of wild blue camas in Montana springtime has nothing to do with postal shipping speeds. However, it is pretty.

Time is running out for holiday shoppers to get their orders in and arriving before their respective holidays. We likely have already missed the deadline to make sure a Hanukkah package arrives by the first night of the holiday, but there are 8 great nights to celebrate with a new pen.

Christmas shoppers have until December 15 to order pens and use the United States Postal Service’s Ground Advantage (cheapest) shipping service. Orders must be placed by December 19 and using Priority Mail to arrive in time for the big day.

International buyers, we can get you cheaper rates than our system generates for you. The system we have undercharges for FedEx…but if you prefer USPS International Priority Mail, it is much cheaper than the system generates for you. HOWEVER, International Priority Mail has been inconsistent in its delivery times. Your best bet is to order as soon as possible. USPS says it will deliver in 7 to 10 business days, but they do not promise this, as packages sometimes get trapped in your country’s customs office.