Baltimore Pen Show, Here We Come!

For the last several years, we have heard about the splendor of the Baltimore Pen Show. This is what we’ve heard: It is well organized by our buddy Bert Oser. It is a premier place to buy and sell premier luxury pens. It is well advertised to the public, and it is becoming the premier pen show in the country.

This year, we are going to experience it for ourselves to see if it is all true. We have spent the past month restoring dozens of vintage pens and prepping never-before-seen-on-our-site luxury pens.

PLUS, for showgoers, we have dropped some of our prices to clear out some of our luxury inventory.

On a personal level, this is my first trip to Baltimore. I bemoan the fact the Orioles aren’t yet playing, as I’d love to see a game at Camden Yards, but I hope to have some fun exploring the waterfront and old Fort McHenry, home of “The Star-Spangled Banner,” if there’s time.

And, of course, the very best part will be getting to hang out with old friends at a new location, while also making new friends at a show I’ve never seen before. Please be sure to come check it out and say, “Hi.”

Search by Nib Size

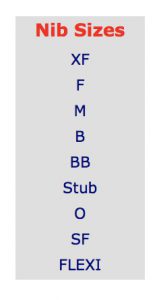
You can now search for our pens by nib size. Although this box is just an illustration, the one near the top left column of the vintage pens or pre-owned pens pages is live and will show you the way.

Size matters…at least when you’re writing and want to use a specific nib point.

Following the advice of my brilliant and beautiful fiancée, we’ve added a new way to search for pens on our site by virtue of the nib size and writing qualities.

Clicking on a blue letter is all you need to do to pull up all of our pens with the nib you want. You’ll still need to read the description to find out how wet, dry, smooth or scratchy a nib might be, but this new nib-search box will help you winnow down your options much more quickly. The only other detail to look for is whether the pen is a tweener pen—a fine-medium or a medium-broad, that sort of thing.

All of our vintage pens and preowned pens will get pulled up by nib together! Who knows what treasures you might find that you weren’t initially looking for! You can find the nib search box on the top of the left column on our home page, vintage pens pages and preowned pens pages.

In case you need help translating the letters into nib sizes, here’s our guide:

XF = Extra Fine
F = Fine
M = Medium
B = Broad
BB = Double Broad
Stub = Awesomeness
O = Oblique
SF = Semi-Flex
FLEXI = Flexible, somewhere in the vicinity of wet noodle

Priority Postage Hike

As many of you have probably noticed over the past couple years, the United States Postal Service has raised its rates three or four times. Our payment processor, PayPal, has also raised its rates. We have resisted raising our shipping & handling rates for as long as we could, but, we finally had to give in for our U.S.-based insured, Priority Mail.

The good news is that we have not raised our rates for standard, uninsured U.S. shipping, and we have not raised our international shipping rates. To our friends in Canada and Mexico, please remember that we refund the shipping amount not used from our international shipping rates. Our programing only recognizes foreign and domestic, and we cannot, yet, identify which country gets which rate.

In spite of the rate increases, we have found that the United States Postal Service remains the most affordable and secure shipping option that we have. UPS and FedEx cost nearly double the amount for us to ship with them, and our company is still too small to qualify for their bulk discounts to be competitive. Furthermore, almost every time we have shipped a pen using UPS for a customer special request, UPS has either lost or damaged the pen. Out of the hundreds of packages we ship every year, the United States Postal Service has been nearly perfect now that they’ve added tracking to all of its parcels shipped.

How Do I Re-Sac a Vintage Pen

You can’t make an omelette without breaking a few eggs, the old saying goes, and it is true for learning how to fix vintage pens. Today, we are going to learn how to restore a lever-filling fountain pen…or re-sac it, as they say. But first, you are going to have to get used to the concept that you’re going to destroy a few pens along the way—even if you’re careful.
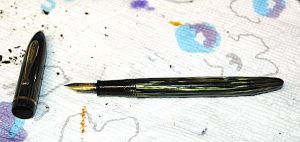
Find a few good, cheap vintage pens to practice restoring before experimenting with more expensive models. This deformed Sheaffer Balance 350 is a great starter pen.

When you are starting out, don’t begin with an unrestored version of your grail pen. Find some broken-down cheap pens such as Wearevers, Esterbrooks or even this banana’d Sheaffer 350 Balance. The longer you are on the hunt, the more you will find vintage pens that turn into the shape of bananas. The deformation happens when the pen is left in the sun or near a heater for too long, which warps the plastic/celluloid.

In addition to a good practice pen, you will need some ink sacs, a pair of spark-plug/section pliers, a long dental pick, sac shellac or rubber cement, scissors that can cut through rubber ink sacs, a jar or cup, clean water, polish, a cloth rag, paper towels, a hairdryer, a razor blade and, if at all possible, an ultra-sonic cleaner. You can get most of these items pretty cheaply. One trick of the professionals is to buy a pair of rubber coated spark-plug pliers, instead of formal “section pliers” that you can find on many pen restoration sites. Why? Spark-plug pliers can be had for less than $10 at most auto parts stores. Section pliers are almost always the same, exact pliers but marked up to $20 or $30. In the early days of pen restoration as a hobby in the 1970s and ’80s, a lot of guys used regular pliers and cut off two one-inch sections of hose to cover the teeth of their normal pliers. That’s how I was first taught.

Attempting to keep this simple, I’m going to break this down into what I hope are very simple steps to make this as fun and easy an experience as possible.

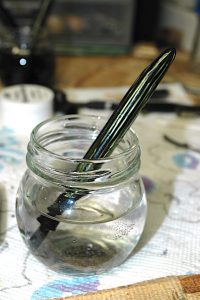
  1. I like small mustard or baby food jars to use for filling with just enough water to get the pen wet from the tip of the nib to just over the threads of the barrel.

    Fill a cup with just enough room-temperature water that you can stick your pen in and go just a little bit over the section and past the cap threads. (Sections are the writing grip into which the nib and feed are inserted in one end.) Let it soak for at least an hour. (Never use hot water.) This leaches out a lot of the dried old ink in the nib and inkfeed, while also potentially softening any glue or shellac used to hold the section tightly into the barrel. Many of the old factory repair manuals encouraged repairmen to use a dab of sac shellac to hold the sometimes loose pressure-fit sections into the barrel. WARNING: Water is necessary, but it also isn’t your friend. Black hard rubbers turn chocolatey brown in water fairly quickly. (An hour might be too long for some rubbers.) Some celluloids get more brittle or discolored when in water too long. Be sure to dry off the pen as soon as you remove it from the water.

2. Use the hairdryer to warm up the space where the section and barrel meet. DO NOT melt the plastic or set the celluloid on fire. All you need is a little warm to the touch. Until you get comfortable, keep the heat to barely noticeable to the touch. Grip the section, and only the section, with your rubber coated pliers. Very gently and slowly begin to twist counter clockwise as you hold the barrel in your other hand. It is common to hear some very scary cracking sounds. Usually, that sound is the petrified rubber ink sac in the pen breaking apart as you open. Sometimes it is the pen barrel breaking. Experience will teach you the difference. If you feel the section coming loose,
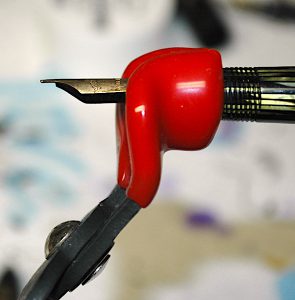
Grip only the section with rubber coated pliers, such as these spark-plug pliers. Don’t grip too tightly, just enough not to let go.

keep twisting slowly and gently. If you do not feel it turning or you feel it actively resisting, stop twisting. Some sections—especially Parker Duofolds and Vacumatics—were threaded into the pen barrels, which is why we usually start with a twist. Most pens of all brands were straight pressure-fit sections. HOWEVER, some brands—especially Wahl-Eversharp, although they were extremely inconsistent—used little pins in the barrel or section to hold the section firmly in place. You CANNOT twist those sections without destroying the barrel or section. If a section resists twisting, hit it with a little more heat and very gently start trying to wiggle it in teeny, tiny side-to-side motions while pulling straight out.

This is the most dangerous part of the entire restoration job. This is where probably 80% of all pens break, if they are going to break. ALSO, celluloid is insanely flammable. DO NOT get it hot. If it catches fire, it burns like a magnesium flare. It is an extremely hot burning flame that burns extremely quickly. Early on, I accidentally set a Vacumatic on fire. It scared the hell out of me, and it was a miracle I didn’t burn down my house. Even after getting it under running water it didn’t go out right away. I had to drop it in the steel sink and flood it to put the fire out. In about 10 seconds, it burned away the majority of the barrel. Be careful with the heat.
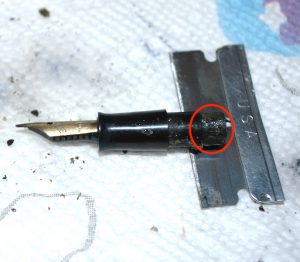
Use a razor to scrape the old sac pieces off the section nipple.

3. Once the section is free, scoop out the old sac guts from inside the barrel with the dental pick. Sometimes those guts stick pretty good to the inside of the barrel. A flashlight or gun light can help you see in to make sure you got it all. Do not put water in the barrel to clean out the sac or old ink. This will likely ruin and rust-out the pressure-bar assembly.

4. Use the razor to scrape the remnants of the old ink sac from the nipple of the section. Be careful not to cut yourself or split open the nipple.

5. Fill your ultra-sonic cleaner with clean, room-temperature water. Sometimes a drop or two of ammonia will help badly clogged pens. Put enough water in to completely submerge the cap and section assembly. Before you turn it on, let the cap soak for a minute or so. This allows the water to penetrate the inner cap, where a lot of old ink is usually trapped. After the cap and section have had a minute to soak, turn on the ultra-sonic cleaner for no more than 2 minutes.
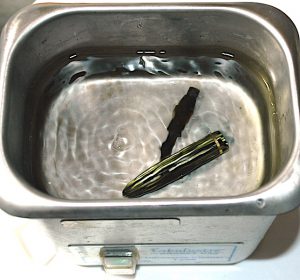
If feasible, an ultra-sonic cleaner is the easiest way to remove old ink.

You might not see a lot of “action” with your eyes, but the vibrations are practically violent to the parts that are submerged. It can shake free most of the old ink in two minutes or less. If a cap lip is cracked, I’ve seen some caps crumble in the ultra sonic cleaner. That’s how powerful it is.

NEVER stick your fingers in the ultra-sonic cleaner when it is turned on. It can damage your fingers and their joints. Also, don’t leave your parts in for much longer than two minutes because the cleaner will get hot and potentially damage or discolor your parts.

Turn off the ultra-sonic cleaner, collect your parts and drain the old dirty water. Then rinse the parts under the faucet with room temperature water for a few seconds. Shake the parts dry, and then dry them with a paper towel on the outside. Q-tips are perfect for drying and removing the remaining ink from inside the cap.

6. I like to polish the pen next, especially the nib. It allows me to see any major flaws I might need to work on, such as replacing the nib while the section is exposed. I use a pin-head dollop of MAAS metal polish on a Q-tip to get the nib shining like new. I use the clean side of the Q-tip to wipe off the remaining polish. Then I dip the nib in water and dry it with a clean rag to get off the remaining, invisible polish remnants. I repeat the process with a pea-size drop of MAAS metal polish on the rag and polish up the rest of the pen, rubbing it down several times with the clean parts of the rag…avoiding water.

Every repairman I know seems to have a different process for polishing a pen. The method above is adequate for most pens. Yet, if you’re a detail-oriented person, there are myriad methods of multiple polishes or wet sanding that do a much more factory-fresh looking job. Yet, those methods take up to an hour and are worthy of their own article.
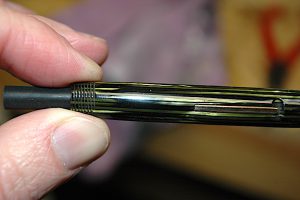
This photo illustrates how to eyeball the spot you need to trim the ink sac.

7. Sizing an ink sac. How detail oriented are you? You can easily research what size sacs went into what pens. You can measure the nipple with a fine ruler using increments of 1/64th of an inch, the way old pen repair manuals did to find the right aperture width of the ink sac. Or, you can eyeball it.

The real trick to eyeballing it isn’t fitting the sac to the nipple but finding the right sac to fit inside the barrel. You do not want the edges of the sac to snug against the inside of the barrel. It is best if the sac can easily slide in and out of the barrel, preferably with a little space all around the sac. If one is to carry a pen in their shirt pocket, the goal is not to transfer body heat through the barrel to the sac and ink, which might effect the interior pressure of the ink in the pen and have it leak a bit on you with a full pen.

Regardless of how you choose the sac size, you will likely need to trim the ink sac before installing it. Most ink sacs are longer than the pen barrels. My rule of thumb is quite literally a rule of thumb. I stick the sac in the barrel as far as it will go. I then pinch the end of the barrel at the threads, with my thumb having just enough reach to go past the threads. Pinching awkwardly down on the sac, right where it exits the barrel, I remove the sac. Gaging where my thumb tip is, I trim the sac at the tip of my thumb. Usually, this allows just enough room for the section and nipple inside the pen so that the sac can be as long as it needs to be. You can double check the length by putting the section and sac next to the empty barrel, as they would fit inside it.
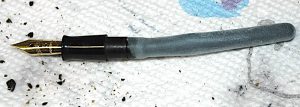
Use Talc to powder and preserve your new ink sac before final re-assembly.

8. Most modern pen restorers use orange shellac to affix the sac to the nipple. Before most of us learned how to make or knew where to find orange shellac for sale, rubber cement was the go-to adhesive. Orange shellac is nearly perfect, as it can harden and still be water soluble. Rubber cement forms a good seal at first but can be more easily effected by heat and aging. Yet, it better fills-in tiny hairline cracks in the nipple, hopefully extending the functional life of the pen. (NEVER use super glues of any kind. The rubber ink sacs will give out long before the super glue ever does and you can ruin the pen by forever getting the section stuck in the barrel…or sticking other wrong parts together.)

On this pen, we painted only the nipple with a thin layer of shellac. Then we slipped the sac over it. After that, we dusted the sac with pure talcum powder, which helps to extend the life of the sac.

9. Fitting the section back into the barrel is the second most dangerous part of the restoration process. Sometimes the barrel opening shrinks while the section is out and cracks open if you put the section back in too quickly or roughly. If the section feels like it is having difficulty going back in, maybe warm up the barrel end a little and gently wiggle the section back into place. Although it doesn’t really matter, I like twist the section into place where the top of the nib is even with the lever on the pen.
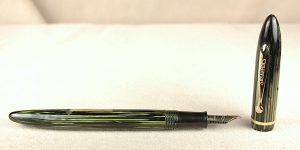
Congrats! Your pen is fully restored, looking beautiful and ready to write.

If the section is too loose, you can tighten it up with a tiny cut out of a piece of onion-skin paper. Or, like the old repair manuals, you can use a small drop or two of shellac on the section. Just wipe off the excess shellac and keep it out of the threads.

10. Let the shellac dry. As the shellac is water soluble, I wait about 24 hours before I test the pen with water or ink. Once the shellac is dry and the pen tests well, you’re all done. Congrats!

It took longer to read this article than it likely will take you to restore a pen—at least once you get used to the process. Fixing and writing with vintage pens is my favorite part of the hobby. If you like seeing how things work and getting your hands dirty, you’ll love pen repair. The only thing that improves it for me might be repairing pens while listening to a Cubs game on the radio and nursing a cold beer.

Always feel free to write in with questions. And always remember to go slowly and take your time. It isn’t a race. Enjoy the zen of pen repair, and best of luck to your future projects!
Identifying More Fake Montblancs

We recently received two more great examples of fake Montblanc pens from a collector to share with you. As you might recall, we wrote a much more extensive piece about identifying fake Montblancs in a piece we called: Don’t Be Fooled by Fake Mont Blanc Pens.

This time we are just going to showcase the features of these two specific fraudulent pens.

A close inspection of this pen reveals that it is a reproduction of the rubberized Montblanc Starwalker fineliner pen.

Up first is meant to be a rubberized Montblanc Starwalker fineliner. At a glance, it looks like it could be the real thing. BUT! A closer inspection proves it isn’t. The first thing you can notice in real life, and not online, is that the rubber material is very sticky as it decomposes. We haven’t experienced that in the originals, but this is common in cheaper rubbers and plastics. Those cheap, 1990s Sensa office pens with the huge “ergonomical” rubber grips decomposed to a sticky mess all the time, just like this pen.

The biggest visual error you can spot is that the tail is black and not platinum or rhodium plated like the original.

We can’t get a good enough photo of it, but the floating star inside the clear cap topper is scratched.

Plus, there is no “Pix” written under the pocket clip. While that pocket clip does have a serial number, it is a two-part number with a gap between numbers, which Montblanc doesn’t do. Lastly, the pocket clip has a more obvious weld to the cap.
Pictured is a fake Montblanc Hommage à Nicolaus Copernicus ballpoint pen. Yet, to hold in real life, will easily prove it is not the real thing.

The other pen on today’s showcase is meant to be a copy of the Patron of the Arts Montblanc Hommage à Nicolaus Copernicus. At a glance to the untrained eye, it passes. It has what looks like the anthracite-colored lacquer on the ribbed body with potentially sterling silver rings. There’s what appears to be a diamond in the clip.

Yet, the real pens had a yellow diamond or green-yellow jewel, depending on which edition you had.

Again, in real life, this pen is extremely light weight. Sometimes experience helps, and, having held real samples of the Copernicus, this feels 2 or 3 times lighter.

Another big give away is that there are no markings on this pen. No serial number, “Pix” under the clip,” no limited edition number and no “Germany.”

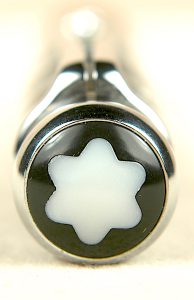
It is difficult to see in the photo, but you can see the edges where the white part was glued into the black part of the logo. On Montblanc’s high-end pens, there are no seams that are detectable, and we think the original pen had a mother-of-pearl star instead of a white plastic star.
One sneaky thing the pen forgers got right is that it uses real Montblanc ballpoint refills.

The last big thing they got wrong is the company brand logo of the 6-point star or snow cap representing the mountain. This one is a soft plastic that looks odd in real life, and you can see the edges of the hole they glued it into on the tail. True Copernicus pens have a seamless logo that is lacquered over to look like one piece regardless as to whether it really is.

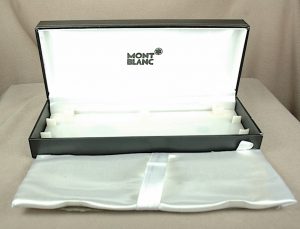
Last but not least is the box. We received two pens in one box that is made to look like a true Montblanc box. The differences are pretty obvious. Most simple MB boxes similar to this have a leather or faux-leather outer casing in black. This is a black paper case. On the inside the company name is poorly silk screened on with some black ink bleeding into other parts of the name/logo. Annnd, the pad that holds the pen is a cheap cardboard with a paper tray beneath it. The black leather Mont Blanc cases have a padded beige or tan cloth lining, which you aren’t intended to get underneath. Papers for the legit pens are stored between leather box and the outer cardboard box. Please see the picture of the fake below.

As always, we hope this helps you spot fake Montblanc pens in your quest for inky glory as a writer or collector.

Paper outside, poor silk screening inside and the wrong pad and under-tray make this Montblanc box an obvious fake.

The Pens that Ended WWII: Italy

Did you know that toys paid for the pen that ended WWII with Italy?

For several years, with the help of many readers, I have written about the pens that ended World War II. After solving several mysteries about the pens that ended the war with Germany, I thought this fun and fact-filled segment had come to an end.

Fabulous readers Francis Turner, Tom C., Gary C. and Mike C convinced me otherwise. All four of these men are unrelated and each reached out to me independently of one another and very close to the same time.

Yes, I had discussed the surrenders of Japan and Germany, but I had left out the critical surrender of Italy and its new-forged partnership with the Allies.

After all of the other mysteries were solved, I never would have guessed that toys would be at the center of the story about the pen that ended the war in Italy.

Toys?! Yes, toys.

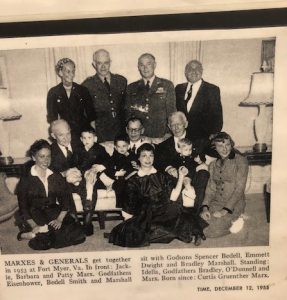
Louis Marx’s family sits with several of the generals who won WWII. Many of the young boys in the photo were named for after a general. Photo courtesy of Francis Turner.

Enter Louis Marx. To the best of my research, he had nothing to do with the comical Marx Brothers. Instead, Louis Marx and his brother David were toy makers in New York City, when they opened their own company in 1919. Their particular talent in the early days was taking the ideas of current childrens’ toys and making them better, more durable and cheaply than their competitors. They also were better marketers. Although they did not invent the yo-yo, they were the ones initially behind making it world famous in the 1920s. They and their company would go on to invent thousands of other toys, famously including Rock ’em Sock ’em Robots and my absolute favorite toy as a little boy: the Big Wheel.

Marx Toys was one of the few companies to thrive during the Great Depression, and along the way Louis happened to become very close friends with the men who would go on to save the world from fascism. Yes, his close friends included Dwight D. Eisenhower, Walter Bedell “Beetle” Smith, Omar Bradley, George Marshall and Curtis Lemay. Talk about having powerful friends in high places.

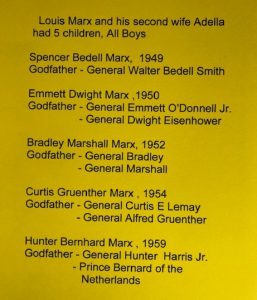
Were they really that close as friends? Absolutely. Smith gladly took on the role of godfather to Louis’ first son, and Eisenhower served as godfather to his second son. In fact, eight of the leading Allied generals of the war would volunteer to be the godfathers to 5 of the Marx children.

Much the way Kenneth Parker gave his old buddy Eisenhower Parker 51s to sign the surrender with Germany, Marx gave his buddy Beetle a pen to use for a surrender ceremony. Use it he did, but before we get to that, let’s take a quick look into the life of Gen. Walter Bedell Smith. He remains a fascinating character.

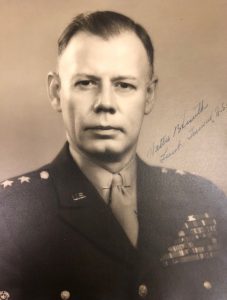
Gen. Walter Bedell Smith signed the armistice with Italy and also the German unconditional surrender. He later became head of the C.I.A.

Best known as Eisenhower’s “hatchet man,” Smith is remembered as Ike’s Chief of Staff at several crucial points during WWII. Although he was often tough as nails, he was far more politically savvy than people gave him credit, and he really embodied much of the American dream rising out of nowhere to become an important figure.

Smith was born in Indianapolis in 1895. He didn’t graduate high school, but he did attend a little college before eventually joining the Indiana National Guard in 1911. He remained in the Guard helping during floods and even as part of the Pancho Villa Campaign on the southern border. He spent 6 long years in the military as a private and then non-commissioned officer until World War I. Given his incomplete education by today’s military standards, he’d have never gotten very far in the ranks, but the Army needed young men with any military experience, and he was promoted to second lieutenant in Europe in 1917. Wounded at the front, Smith recuperated and earned a promotion to first lieutenant, a rank at which he’d remain for another 10 years, as he also furthered his education. After achieving his rank as captain, he’d stick it out 10 more years to make the rank of major in 1939. Then World War II began.

Experience and a swelling Army made his quick promotions to Lieutenant Colonel and “full-bird” Colonel inevitable, but it was his tenacious hard work and talent for organizing and co-ordinating between Allied army units that rocketed him up the ranks to become a 1, then 2 and 3 star general serving as the chief of staff first for Gen. George Marshall and then Eisenhower.

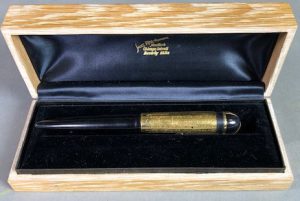
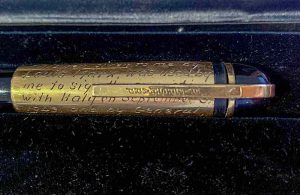
This is the Wahl-Eversharp Skyline pen given to Gen. Smith by his friend Louis Marx that was used to sign the Allied armistice with Italy on Sept. 3, 1943. Like so many other Skylines, its cap sleeve has come loose and is sliding down the cap a little.

In August of 1943, Ike entrusted Smith on a secret mission to negotiate an armistice with Italy, which would then join the Allies against the Nazis. By Sept. 3, they had signed a deal with this Wahl-Eversharp Skyline fountain pen given to him by Louis Marx. Pay close attention to the engraved gold cap sleeve and the engraved plate on the pen box! Tom C., a former accountant to Louis Marx Jr.,  was the first to tell me about this pen, and he would go on to sell it and another important pen to Francis Turner.

Turner is the gentleman who first explained the Marx connection to me. You see, he is the owner of the Marx Toy Museum in West Virginia, near the site of one of the original Marx toy factories. Although the toy museum is no longer in daily operation, you can take a virtual tour online, while many of the physical exhibits are on tour at other museums around the country.

A close-up of the specially engraved cap of the Italian armistice pen.

Turner’s passion for Marx Toys is on par with the most devoted passions for pens that I have ever seen, and it was pens that brought our paths to cross. I cannot thank him enough for many of the photos in this post and the stories that go behind it.

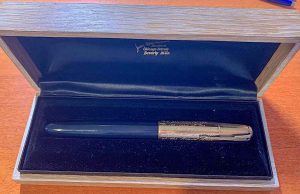
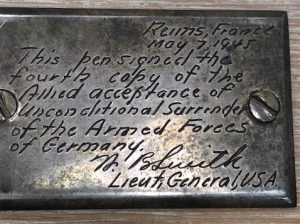
As we learned in previous posts, Kenneth Parker gave Eisenhower Parker 51s to use in the ceremony that brought the unconditional surrender of Germany. Gen. Walter Bedell Smith signed the 4th copy of the German surrender with one of those 51s, and he and Ike chose to give that pen to their close friend Marx! It, too, has a very unusual gold sleeve around the normal cap with its history engraved on it. The pen, itself, is an age-appropriate Vac-filler in Cedar Blue. Its Saks Fifth Avenue presentation box also has an engraved plate with the pen’s history. This is the other pen Turner acquired and shared with me for this story.

This Parker 51 was used in the signing of Germany’s unconditional surrender. It, too, was given to Louis Marx by Gen. Smith.


Smith’s own history continued to get more fascinating. After the war, he was promoted to the status of 4-star general. He also remained an Army general while serving as ambassador to the Soviet Union from 1946 into 1948. Smith continued on as a 4-star general while then also serving as head of the C.I.A. from 1950 into 1953! When Ike was elected president, Smith was chosen to be Under Secretary of State. He didn’t keep that posting for very long, but he continued to help the Eisenhower administration.

Smith passed away from a major heart attack in 1961. His buddy Louis Marx, whose upstart toy company had grown into the biggest in the world by the 1950s, would live until 1982. 

An engraved plate on the box of the Parker 51 used to help end WWII, describes the pen’s special place in history.

I certainly hope you find all of this history as interesting as I do. If anything, my jump down the rabbit hole of WWII pens has taught me is that I am far from finished uncovering the pens of WWII. 

What pens did Neville Chamberlain and Adolf Hitler use to sign their ill-fated agreement? What pens did Franklin D. Roosevelt, Winston Churchill and Joseph Stalin use to sign their agreements at Yalta? What pens were used to ink the deal tying the U.S. to China’s Chiang Kai-shek? What did Roosevelt sign the Lend Lease Act with? Clearly there are more famous pens in this war. I look forward to uncovering them with you in 2020 and beyond.

How Do I Replace a Lamy Nib?

(There is risk in doing any repair. We will not be held liable for what happens to your pen if you break it while trying the following advice.)

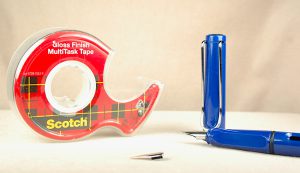
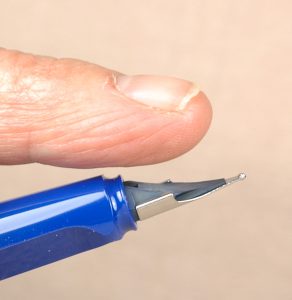
Changing a nib on a Lamy Safari or AL-Star is easy. All you need is the pen, tape and a replacement nib.

Changing a nib on a Lamy Safari or AL-Star is easy. All you need is the pen, tape and a replacement nib.

Lamy Safari and AL-Star pens are among the most popular pens on the market today. Bright, modern, affordable and made to work well under the most trying conditions, what is not to love? Many people’s favorite feature is that the nib is easily changed.

The genius German engineers and designers behind this pen put the nib on a pressure-fit track system for easy assembly and repair.

How easy is it? The only tool you need is a piece of tape. Go ahead. Get your tape, and I’ll teach you how it is done.

Place your index finger on the inkfeed to stabilize and support the fragile feed when you change a nib.

Place your index finger on the inkfeed to stabilize and support the fragile feed when you change a nib.

First, it helps if your pen is empty and dry.

Next, gently grip the section (writing grip) of your pen and place your index finger gently on the plastic inkfeed under the nib to brace it.

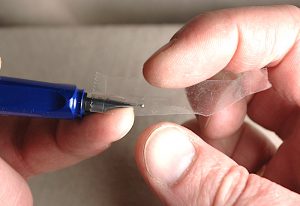
With the top of the nib facing you, place a piece of tape on the entire nib. Be careful as the plastic inkfeed under the nib is easily broken if you are not careful, and those are much more difficult to replace, as Lamy doesn’t give out those parts.

Put your other index finger on top of the tape and nib. Using your thumb, grip the ball of the nib from underneath it.


Tape helps your fingers gain added traction to slip off the nib.

Tape helps your fingers gain added traction to slip off the nib.

Pull, gently and straight out, on the tape and nib tipping. The nib should slide right off the inkfeed.

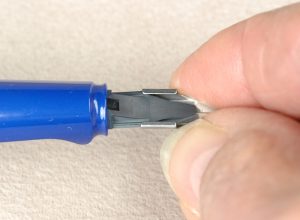
Turn the pen over, with the bottom of the inkfeed facing you. Turn your replacement nib upside down and align the little runners with the tracks of the inkfeed.

Slide it into place until it stops. Turn it over again to see the top of the nib. There should only be about a millimeter or so of inkfeed visible.

Voila! You have successfully changed the nib. Congratulations!


Turn the inkfeed upside down where you can see the tracks for the runners of the nib to slide into place. Gently pinch the side of the Lamy replacement nib and slowly slide or wiggle the nib into place.

Turn the inkfeed upside down where you can see the tracks for the runners of the nib to slide into place. Gently pinch the side of the Lamy replacement nib and slowly slide or wiggle the nib into place.

We’ve Move, Once Again: Distracted Blogging

Season’s Greeting from Wausau, Wis. We hope your holidays are joyous and bright.

Wasn’t it John Lennon who said that “Life is what happens when you’re making other plans”?

I had a lot of plans for ThePenMarket.com in 2019. SQUIRREL! There are still so many blog posts I’ve started and haven’t yet finished. Oh, look at this shiny new thing. I got about 500 new pens posted to the site over the year, but, did you hear that? What was that sound? Then I began my quest to learn how to restore mechanical clock movements. Are you hungry? And, of course, I got engaged to the most brilliant woman I’ve ever met.

Now, we’re in beautiful Wausau, Wisconsin. It’s snowing! How long will we stay in Wausau? Not sure. It has been that type of year.

In the meantime, the business is unpacked and fully operational. We’ll begin posting new pens soon, and, hopefully, I will get on pace again with more interesting blog posts––including a new chapter to the popular Pens that Ended World War II series.

May all of the holidays celebrated by our many readers be happy ones, and may all of our 2020 be more focused and prosperous.

Another Crazy Summer

Dawn and I take a coffee break during our busy summer of 2019.

I’m engaged! Certain friends have accused me of “burying the lead” in my news of late, so I’m just gonna put this out there at the top.

Pen shows lead to true love, it turns out. Dawn and I met at the Ohio Pen Show, and it has been the most amazing relationship I’ve ever had. (She seems to agree on her side, too.) This past June, I had a custom ring made from the gold of old fountain pen nibs too destroyed to be of future service to the pen community, and I gave it to Dawn (who also loves pens) in July. She said, yes, and all we have left to do is decide on where we’ll live, tie the knot and live happily ever after. Piece of cake, right?

Of course, the world of pens has been exciting with lots of travel this summer, too! The only downside was that Dawn was unable to join me for these shows.

The St. Louis Pen Show was bigger than last year, and a huge draw for crowds. Anne and her husband continue organizing and advertising the daylights out of that show. We were fortunate this year not to have the blistering heat nor any tornadoes.

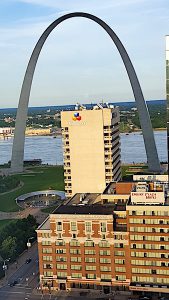
Here’s the gateway to the west, the St. Louis Arch, as seen from a roof top.

The camaraderie of this show is something else. All the first-year vendors and attendees seemed to have this bond over having been firsts to attend. It was almost like we had a secret club handshake. It was a blast to catch up, and there were some “sick,” as the kids say today to mean “awesome,” pens at that show. Vintage pen collectors found scads of old treasures, and modern pen fans were dazzled by the tons of high and low-end writing instruments.

Always popular is the free-to-the-vendors lunch, and we had a dessert party this year before the auction. AMAZING deals were to be had at the auction. If you ever want to get into vintage on the cheap, try their auction. Many of the pens were fully restored going into the auction and sold well below what they would normally get at a show or online.

Outside of the pen show circuit, I’ve continued my training on clock repair. I can fix most standard cuckoo clocks in my sleep, and I’m getting much better at sequencing spring-wound clocks.

Before you know it, I was off to the D.C. Pen Show! The traffic and customers are always amazing at DC, but my favorite parts are outside of the show.

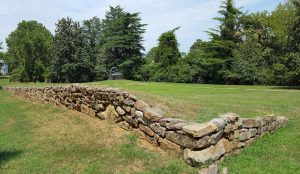
This is the Confederate’s view of the battle of Fredricksburg at the top of Marye’s Heights. This is all that is left of the original stone wall that shielded the Confederates. The ground now comes up to the top of the wall on the Yankee side of the wall, but during the battle no Union soldier made it past where you see that line of trees in this photo. Yet, nearly 10,000 dead and wounded would lay along the hillside heading down into town from this position.

I consider this to be my vacation show. Every year I try to see new sights and sounds. This year I went to the Battle of Fredricksburg National Park before arriving at the show. This has to be the smallest national park. Only a couple acres of the devastating battlefield have been preserved. What most people remember from their Civil War history is the assault on Marye’s Heights. Union troops cross the Rappahannock River and sack the town of Fredricksburg. Confederate General Robert E. Lee beat the slow-moving Union General Ambrose Burnside to the battle site and claimed the high ground. Burnside would throw battalion after battalion up against the Confederate forces atop Marye’s Heights. Hiding behind a stone wall, a mere 7,000 rebels held off at least triple their number, killing or wounding about a quarter of the Union Army.

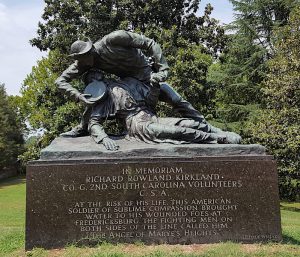
This statue pays tribute to Confederate soldier Richard Kirkland for his bravery in delivering water to the dying Union soldiers.

Yet, what really amazes me is the story of this battle that is less well know. After the battle, thousands of dead and dying men lay below this wall. The wounded made terrible groans and calls for help as they lay dying. The fighting had only barely ceased for the day. No one was rushing forward, yet, to collect the wounded for fear of being shot from above. However, the cries of the wounded were far too much for one Confederate soldier named Richard Kirkland to bear. So he scrambled out of his safe place behind the wall with a full canteen of water to offer comfort to the men he had potentially just shot…and who might still try shooting him out of resentment. As he’d go back to his wall for more water, more of his fellow soldiers handed him canteens filled with water to ease the suffering of the dying. Nobody on either side stopped his act of extreme bravery and kindness. Kirkland would eventually be immortalized as The Angel of Marye’s Heights.

The dramatic sky behind the Washington Monument is almost as stunning as the tribute to our first president.

Having visited dozens of Civil War battlefields, it is really strange to see the entire town having grown up the side of a hill that was once drenched in blood. I wondered how many of the people knew their homes were on the site of human slaughter. I wondered if any of the homes were haunted. I kinda hoped they were–not out of malice, just because I like haunted houses.

The D.C. Pen Show was fairly well organized this year, which was surprising given the show’s owner had suffered a heart attack only 2 and a half weeks before the show! Yet, Bob was up and running around much the same as in previous years. It was good to see him up and about. His sister really stepped in to keep the show happening this year.

Traffic at the show seemed a little down but not much. What surprised me were all of the new vendors! Many of the regulars of the circuit were not in attendance, and a new generation of vendors took their places. I never knew there were that many young people eager to get into the circuit with a host of new wares meant for pen collectors but not frequently seen at these events. There was a huge emphasis on paper, pen and paper carrying devices and a several new repairpeople I’ve never met or heard of before.

Here’s the U.S. Capitol Building on a very humid day.

However, some things never change, and nights down in the bar discussing pens until closing time, along with the joy of smoking cigars and drinking with the Black Pen Society never go out of style.

After the show, my vacation resumed with another trip to the National Mall. This year I walked the park space between the Washington Monument and the Capitol Building. It was warm and very humid, but not uncomfortable. I’ve seen so many photos of each of these landmarks, but it is quite something special to see them in real life…no matter dysfunctional the Capitol Building might be.

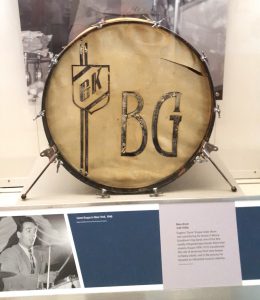
Gene Krupa’s bass drum while he was with the Benny Goodman big band making a huge hit out of the anthem “Sing, Sing, Sing.”

As a decidedly unusual child, one of the first things to go on my bucket list at age 10 was the Smithsonian Museum of American history. It took me 33 years to get there, but get there I did this summer. Some people refer to it as America’s attic, and I LOVED it. Only the gift shop sucked. I was hoping to pick up photos of the many incredible objects by way of postcards, but, those weren’t in either of the on-site gift shops I visited. So, I don’t have photos of Abraham Lincoln’s stovepipe hat, Judy Garland’s ruby slippers from “The Wizard of Oz” or the battle flag that gave us “The Star-Spangled Banner.”

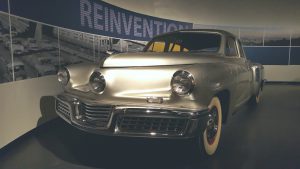
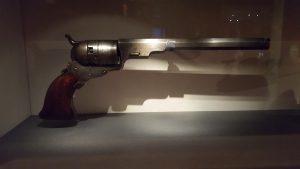
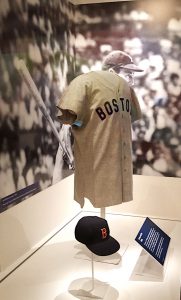
It was amazing to see the first steam engine train ever used in America, the first Colt revolver, a cotton gin, the first electric lights, the first record players, Ted Williams’ jersey and cap, George Washington’s uniform and sword, the table and chairs used to sign the surrender documents of the Civil War, tons of relics from all of our wars and a 1948 Tucker automobile in silver.

The 1948 Tucker has been one of my favorite cars for my entire life. Only 51 were made, and this is the 5th I’ve seen.

You can blame the Jeff Bridges’ movie “Tucker: A Man and His Dream” for getting me addicted to the story of the Tucker automobile, sometimes called the Tucker Torpedo. The real life Preston Tucker was an innovator and automotive junkie who worked in the auto industry and decided to buck the odds and start his own car company after WWII. His first car would use all the latest innovations of the era and put them in a 4-door sedan. Seatbelts, disc brakes, pop-out safety glass, fuel-injection, a high-power 6-cylinder rear engine and a signature third headlight that turned with the wheels that lit the way to where you were going in a turn. These were among the many other innovations in his car. He pushed his luck for as long as he could, but he ultimately couldn’t get enough financing to keep the company afloat. Only 51 of these cars were made. This silver one is the fifth I’ve seen. I’ve also seen a copper one in San Diego, a red one in Las Vegas, a black one in Dearborn, Mich., and Tucker’s wife’s personal vehicle in waltz blue in Murdo, South Dakota. It was an absolute thrill to see this silver one.

Here’s what appears to be the fifth Colt revolver ever made and the one sent to the U.S. Patent Office by Samuel Colt. Notice there is no trigger guard. The trigger flips down when the hammer was cocked.

This is a uniform and cap that was game-worn by the legendary baseball player Ted Williams, who was the last person to bat over .400 in a complete season.

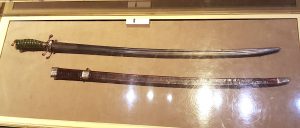
Given the lack of hand protection and the beautiful jade green handle, I suspect George Washington’s sword was more ceremonial than battle tested. Nevertheless, it is a stout weapon good for attack.

Vintage Pen Straight from 1905

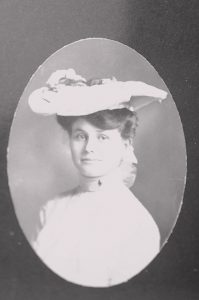
Susie Thomas was given this Conklin M31 in 1905 for her high school graduation. She looks way more sophisticated than most high school kids today.

It is the romantic in me that makes up the story behind an individual pen when I pick it up and look it over. Who owned it? What did it write about? What transpired in the years it chronicled?

We don’t have to wonder about that with our Conklin M31. We know it was given as a gift in 1905 to Susan Thomas. She had just graduated high school and was going to attend business college! We know this because her granddaughter Jane asked us to sell it.

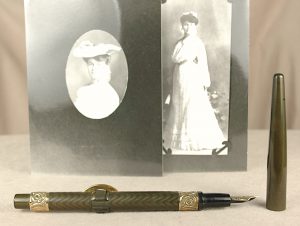
These long-taper capped Conklin pens are extremely difficult to find today, as they usually lose their caps over time…or they break. The black hard rubber can be brittle. This pen is nearly mint…except for the chocolate hazing and #2 14k gold Conklin replacement nib. However, it is a FLEXI nib, which ought to make up for the few flaws.

Susie’s past is a little hazy. She went to business college, which was all but unheard of for a woman in 1905. She got married and had kids at some point, and Jane thinks she died in the 1940s.

Conklin M31 pens with their tapered caps are very rare and a real treasure with a flexi nib. It is even rarer to know its personal history.

Preliminary research shows (so far) that this pen was first issued in 1903. We restored it with a new ink sac. The gold-filled ring is monogramed with a script “T.” A great pen for a museum collection and use.