Tag Archives: Parker Vacumatic

How Do I Restore A Parker Vacumatic

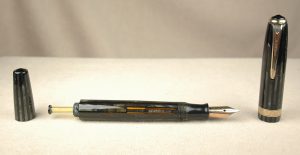
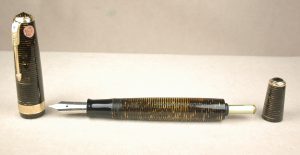
This is a new old stock Parker Vacumatic Maxima in the “Golden Pearl” design. Check out the barrel clarity!

When it comes to vintage Parker pens, Parker Vacumatics are my favorite. I love their stunning art deco designs and over-complicated filling system. The pens have some quirks, too, but, I still love them.

As the Roaring Twenties came to a close, the Parker Pen Company knew it had to build on to its huge success with the Parker Duofold fountain pen or risk losing momentum in a very competitive writing instrument marketplace. Kenneth Parker, son of the company founder George Parker, figured the answer to this problem was a sac-less fountain pen that held more ink than most any other pen on the market. The key to the new pen would be a vacuum pump that used a rubber diaphragm invented in 1928 by Arthur Dahlberg. It was a device that Sheaffer, Waterman, Conklin and Wahl-Eversharp turned down. That device would be the foundation of a pen Parker first released to the public in 1932 as the Golden Arrow. Yet, the company would soon rebrand it the Vacumatic.
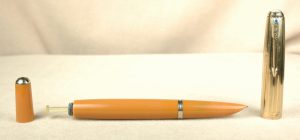
More than a Vacumatic-filling Parker 51, this is the rare, legendary “yellowstone” color in like-new condition.

During the next 16 years, Parker would feature the Vacumatic filling system in 3 of its most famous pens: the Vacumatic, the 2nd generation Duofold and the Parker 51. If you get into vintage pen collecting, odds are really good that you’ll encounter numerous “Vacs” that need repair. Restoring these pens is both easy and complicated. It really just depends on how lucky you get.

Parker Vacumatics and 2nd generation Duofolds with Vacumatic fillers (sometimes called DuoVacs) were made of celluloid. Celluloid is a beautiful plastic but it ages inconsistently. Some Vacs are as strong as they day they were made. Others that were exposed to prolonged heat might be brittle. In my own very non-scientific experience, I find that the “grey pearl” models of Vacumatics are often very fragile. Soaking the celluloid too long in plain water can damage a pen. ANNNND, for the love of all that you hold dear, keep celluloid pens away from open flames. When celluloid catches fire, it burns fast and hot, like a traffic flare. How do I know? One of the original fountain pen repair books said that one should heat a pen up over an open flame to make it easier to open. I did just that, when I was still learning, and holy cats! I had to leave the damned flaming pen at the bottom of a steel sink filled with water before it would finally go out. NEVER USE AN OPEN FLAME. Turns out hair dryers work just fine.

Vacumatic enthusiasts divide these pens into 3 generations. It is vital to know which generation pen you are working on. 1st Generation pens have a lockdown vacuum tail filler and often an integrated section and barrel. As such, you can’t always unscrew the section from the barrel, as you would the 2nd and 3rd generation pens. Plus, when removing the filling unit, you must first unlock the plunger so it is fully extended. Attempting to remove the filling unit with the plunger locked down will destroy the plunger and filling unit. (Authentic replacements are very hard to find.) 2nd Generation pens still have an aluminum plunger but no lockdown device. They usually have a section that unscrews, too. 3rd Generation pens have a plastic plunger and unscrewing sections. These were World War II production models, and aluminum was rationed.
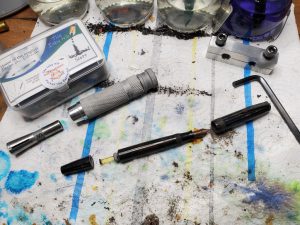
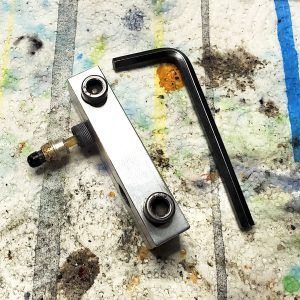
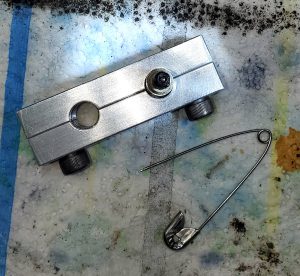
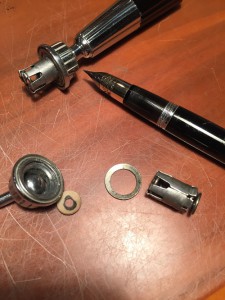
On the left is the Vac Extractor Tool and to the upper right is the “stocks” style Vac unit tool. A Parker “DuoVac” awaits them below.

Unlike most pens which can be restored with the same tools, Parker Vacumatic pens need a special filling unit tool that helps you to remove and return the filling unit into the tail of the pen. I use two different types depending on the challenge of the job. My favorite looks like a medieval stocks with two different size (threaded) holes and is tightened with screws and an Allen Wrench/hex key. The small hole is for debutante and standard/major-sized filling units. The larger hole is for the oversized Maximas. I generally prefer it, as it makes resetting the new unit with a lubed diaphragm a little easier. The other design that I like was invented by Scott Pauley at The Inky Nib. He calls it the Vac Extractor Tool. Unlike the stocks tool that I normally use, this tool has the tightest threaded grip imaginable on the filling unit. My “stocks” just can’t get a tight enough grip on maybe 1 in 20 filling units. That is when I break out the V.E.T. to get the job done. Very clever design, fairly easy to use.

For today’s demonstration of Vac repair, I have chosen a 1945 Parker Duofold with a vacumatic filler. As with the 3rd generation Vacumatics and early Parker 51s, it has the plastic plunger unit. It also has a section that you can unscrew.

As usual, I start by soaking the nib and section with water just deep enough to cover the barrel threads for an hour or so to leach out the old ink and help loosen the section. An hour is usually safe enough not to damage the celluloid with the water emersion.

This is a close-up of the extracted filler unit in the stocks.

After drying off the nib and section, I test to see if I can unscrew the section with section pliers and just a few seconds of heat from a hair dryer. If I can get it started, I leave it for later. Then I thread the filling unit into the stocks and tighten up the stocks. Next I take the hair dryer and apply a few seconds of even heat around the celluloid tail of the pen. I grip as much of the barrel of the pen as I can in one hand and then slowly apply pressure turning to the left with the stocks. I am lucky with this pen that the unit unscrews fairly easily. If it fought me, I would apply a little more heat at a time until it finally gave way.
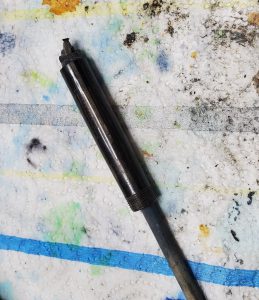
 

Watch how the wooden dowel pushes up through the section side of the barrel to remove the old diaphragm from the barrel.

After the tail-end is open, I then unscrew the section with the nib and feed all still in place. The reason that I don’t unscrew the section, even though I’ve loosened it, is that I want the added strength and stability of the celluloid at that end of the barrel while pressure is being applied to the tail end. The tail end experiences more torque and a little more fragile than the section end. I don’t want to accidentally squeeze the barrel too hard so that I crack the open end.

Sometimes the threaded black-plastic portion of the filler unit comes out, but the plunger portion remains stuck inside the tail. Sometimes the remains of the decaying rubber diaphragm remain stuck in the tail of the barrel. In these situations, I use a wooden dowel to remove them. After the big parts are out, then you need to use a dental pick or some other device to make sure all of the old diaphragm is out. You want to be especially careful with the barrel’s inner threads.
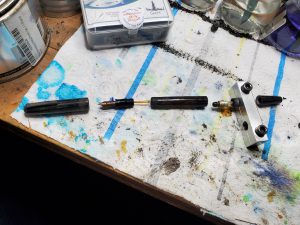
Here is the “field stripped” view of the pen. Note that I do not disassemble the section, nib, feed and breather tube. They are all perfectly happy in place 90+% of the time.

Once the pen is disassembled, the real cleaning begins. There is a trend lately among new vintage pen collectors/repairers online to prove their street cred by also knocking out the nib and feed from the section. This is entirely unnecessary the overwhelming majority of the time and risks breaking things that are perfectly fine as they are. At this point, I just dunk the still fully assembled section in the sonic cleaner along with the cap and barrel. It usually takes fewer than 5 minutes of cavitation to get them clear of old ink and debris. When you are done, dry it all off. I like to buff up the 14k gold nib…if I am not at risk of removing any two-tone plating…apply a little “Super Lube Silicone O-Ring Lubricant” to the section threads and screw it tightly on to the barrel again.

Can you see the little pellet ball in the top of the plunger from this view?

At no point did Parker actually use any glue on these pens. However, over the years, various repairmen did use glues and shellacs. That brown crud on the bottom of the plunger three photos up from here is old shellac. I scrape it off with a razor. (Please note that I leave the filling unit in the stocks for the duration of the restoration process. This helps me to make sure the proper depth is achieved when I screw the unit back into place so that the tail cap and barrel will realign properly.) Then I try to carefully remove the pellet from inside the plastic plunger’s cup. It was really difficult to get a good photo of that annoying little ball. The goal is to minimize damage to the cup of the plunger. I recently discovered there is a man in the UK who make a dremel-friendly drill system to drill out the pellets, but I have not yet tried it. Typically, I use a pin to try scooping out the pellet. It deforms the cup a little, but I try to pinch the cup back into shape when I am done.
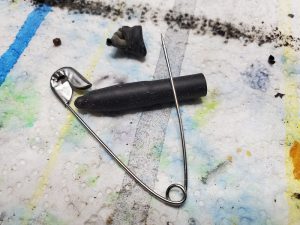
Trim the diaphragm at roughly the point you see where I’ve lain a pin over it in the photo. New diaphragms are usually way too long to work properly. It is vital that the diaphragm can be stretched with the plunger to the point where it almost touches the breather tube inside the barrel. However, if it is so long that it impedes the function of the breather tube, the pen won’t fill or empty properly.

Inside the diaphragm is a new pellet. To start reassembling the filler, you will need to carefully get that rubber dip end of the diaphragm with the ball/pellet in it into the cup of the plunger. Once the diaphragm is secure in the cup of the plunger, you are going to hold the diaphragm in place and push the plunger up through the center of the diaphragm and invert the diaphragm from its original starting position. Once you have the original open lip of the diaphragm rolled down over the plunger, pinch it with your fingers to that metal cone part that I used a razor to scrape the shellac off of. Also make sure the same cone is held into the black-plastic threaded part of the filler unit so that the plunger is fully extended by itself without the rest of the parts joining it. This is tricky and likely doesn’t make any sense until you actually do it for yourself. While the unit is is pinched and the plunger and diaphragm stretched fully, dab some of that silicone lubricant all over the diaphragm. Finally insert the lubed up mess into the tail of the barrel. Make sure to twist the barrel back and forth so the stretched diaphragm doesn’t get stuck on the sides. Don’t release the pinched cone until it is as deep into the tail as your fingers can let it be. It should snap onto its seat when you release it. Finally, you can screw the black-plastic threads back into the barrel. If all goes well, the unit it will feel tight right where you started at. However, even when things go well, sometimes they don’t stop where you started. NEVER overtighten the filling unit. If it starts to snug up early, that’s okay. Sometimes, you might have to unscrew the stocks and reset them a little higher to finish tightening a little deeper than before. It is far more important to get the right snugging of the unit, as the unit holds the diaphragm lip in place while the plunger creates a vacuum with the rest of the rubber. If you overtighten, you can blow out the entire barrel and make it inoperable, ruining the pen. If you don’t get a tight enough closure, the diaphragm will get loose and not work. Don’t worry if the blind cap doesn’t align as perfectly with the barrel as it might have done.
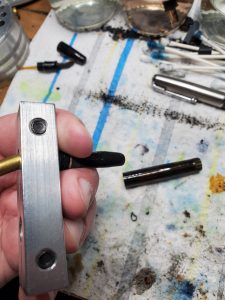
At this point, it is safe to try test filling it with water. Remember it takes 10 to 12 pumps to fill it all the way. If everything looks like it is working okay, the only thing left to do is to polish it to a beautiful luster. Personally, I think wet sanding works best on Parker Vacumatics, 2nd Generation Duofolds and 51s. Tune in this November for our wet sanding tutorial.

Here is our fully restored Parker Duofold from 1945. That wet sanding really makes it stand out

A Very Parker Thanksgiving

Happy Thanksgiving from the Gold Star Memorial Bridge in Groton, Conn.

Thanksgiving hasn’t been this chaotic and stressful for everyone in America since at least World War II…possibly since the 1919 Spanish Influenza pandemic. There’s the Covid-19 pandemic, political turmoil, recession, open-rampant-growing racism, civil unrest and climate disaster for many recovering from wildfires and hurricanes.

It feels more important than ever to take a day to recognize all of the things we are grateful for in our lives. Me, I’m thankful for my fiancé, her mother and I all being healthy and well together in our new home. I’m thankful my parents, sister and her family are healthy and safe. And I’m thankful for all of my friends, whether we know each other from before ThePenMarket.com or because of it.

So many customers became friends who beautifully color my life. In Chicago, I have a Civil-War studying, vintage-camera-loving buddy with fantastic wit and a social-working, philosophizing friend who convinced me to not give up on my novel. There’s the salsa-dancing police detective who specializes in tracking down child abusers in Arizona. A Heinlein-loving pen collector in Virginia. A virologist who is working on the Covid-19 vaccine. A certain retired urologist in Connecticut. A retired sailor in Virginia Beach. A school teacher in Germany. A Waterman-loving Oklahoman. The nursing home nurse in Texas. Several great paramedics in Washington and Colorado. I have a 3-fingered brother from another mother down in Texas, as well as a wonderful roommate and travel buddy who loves cars as much as pens. I’d have never guessed I’d have as many additional new and wonderful friends from the Deep South as I do. I am a Yankee city boy, after all. And, of course, there are many, many other pen friends whom I delight in getting to know through the site. 

The newest friend I think you’ll enjoy meeting is Camy Matthay. Camy reached out to me after reading my series of stories about the pens that ended World War II. Most of those pens were Parker pens, and she is reconnecting with her late father by doing the deepest dive into Parker pens I’ve seen in years.

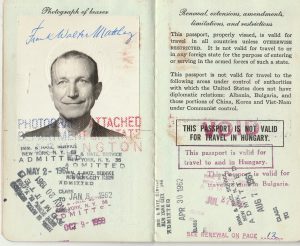
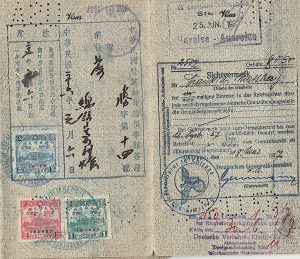
Frank Matthay in his passport issued 1959. Matthay was the leader of Parker exports from 1928 through 1966.

Who was her father? No. Not George or Kenneth Parker. Her father was the unassuming sounding Frank Matthay…the man responsible for making Parker a global brand!

Her story is equally captivating as her father’s. Camy came along late in Frank’s life. And, unfortunately, he died of early-onset Alzheimer’s in the mid-1970s when she was a teen. His memories were robbed of him by the disease, just as she was coming of age and really interested in getting to know her father as a person more than just Dad. Life moves quickly in one’s teens and twenties, and a little later in adulthood Camy decided to reconnect with her late father when she uncovered a treasure trove of boxes filled with his papers, passports, photos and other personal effects.

Frank, as it turns out, lived the adventure of a lifetime. Not only did he live well at a time when most of the world lived in crushing poverty, he saw the world before it lost much of its mystery. He met presidents and Nazis—generals and actual Amazonian headhunters. He helped give birth to the Parker Vacumatic, 51, 61 and 75!

Thankfully, Camy has shared her discoveries with me and is happy to share them with you, too. The following is my summary of her father’s biography with her full approval.

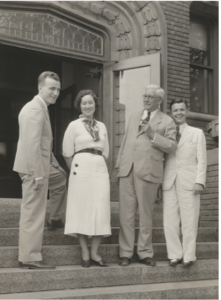
Frank Matthay (far left) with George Parker (white haired guy, founder of Parker Pens) circa 1929.

Frank Matthay was born May 10, 1904, in Beyenberg, Germany. Too young to fight in World War I, he was a talented student in what now would be considered a college-prep high school. Here he specialized in studying the classics, including the languages Latin, Greek, Hebrew, French and his native German. Along the line, he also picked up English.

At the tender age of 19, he immigrated to the United States in 1923. He was sponsored by his uncle. Germany, at the time, was struggling desperately with the national economic collapse of post-WWI reparations and more. He moved to Chicago, where he was supposed to work in his uncle’s grocery store. However, it seems he never worked for his uncle, taking a job initially as a soda jerk and taking night classes at a YMCA. 

It is unclear when and where he mastered English, as well as Spanish, Portuguese and some Mandarin Chinese. Yet, his early training in the German school system likely made it very easy for him to learn any other language put in front of him.

Also unclear is how he joined the Parker Pen Company in January 1928, at the age of 23. His mastery of languages was what got him a job in the export department, and he was soon working closely with George and Kenneth Parker.

By all accounts, Frank was the life of any party with a natural gift of gab and always armed with a joke and amusing stories. He was tall and lean with a broad, easy smile and a glimmer of mirth in his eyes, plus he had a meticulously Teutonic attention to detail. All important traits for setting up a global distribution and sales network in Central America, South America, Europe, Asia and South Africa!

After a year with the company, Frank was sent on his first assignment to Cuba on the two-year-old airline known as PanAmerican. His career would actually parallel the rise of PanAm. He rode on every glamorous (and not-so-glamorous) float plane they had including the very early Sikorsky S-38, Consolidated Commodore and the extremely lux Sikorsky S-40 “Caribbean Clipper,” which was the first of PanAm’s famous “Clipper” airliners.

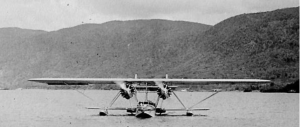
Frank took this photo of a Sikorsky 38 float plane taxiing to the dock.

On the success of his Cuba trip, in 1930 he was sent to Cuba, Haiti, the Dominican Republic, Puerto Rico, Germany, Denmark, Sweden, Switzerland, Italy, France, Mexico and Cuba, once again. During his trip to Europe on the SS Bremen, he witnessed one of the first, if not the first, aircraft launched from a ship at sea. It was a mail plane launched from a catapult to speed the delivery of the mail the ship was carrying. In 1931, he spent 6 months “on the road” building Parker’s network in Australia and Southeast Asia!

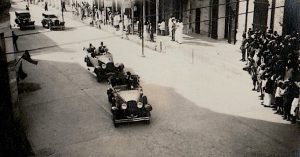
Herbert Hoover’s motorcade drives through Port au Prince, Haiti.

An avid photographer, Frank took pictures of all of his travels. He has images of President Herbert Hoover’s 2-car motorcade in Port au Prince, Haiti. He loved exploring volcanos. On one of his trips to Peru or Ecuador he met and photographed a tribe of headhunters. He even bought a shrunken head from them for $25 (about $330 in our current money). The images look as if they could have been in National Geographic.

Frank took this photo of a tribe of headhunters in Peru or Ecuador. He bought a shrunken head from them for $25.

If you remember my stories about Kenneth Parker befriending Gen. Dwight Eisenhower in the Philippines, Frank was with them!

Fans of the Parker 51 will love knowing that Frank was the architect of the 1939 and ’40 release of the preliminary Parker 51s in South America and the Caribbean! His itinerary in 1939 was packed with extended trips south of the border. His itinerary on PanAmerican Airlines alone cost nearly $27,000 in today’s money. That doesn’t count his hotels, meals, etc. Yet, it also laid the ground work for the sale of tens of millions of Parker 51s both abroad and at home.

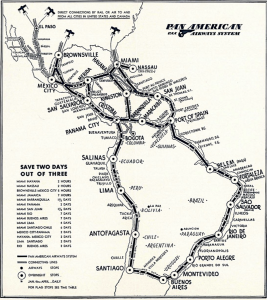
Here is Frank’s copy of the PanAm route map from 1931. Odds are really good that he flew every leg of that route.

Financially speaking, Frank was very well paid for his efforts. At the end of the Great Depression in 1939, he was making $5,000 a year. That is just shy of $100,000 a year in today’s money. And that doesn’t count for his luxury travel and adventures paid for by the company. According to records from Janesville that Camy found, he was making more than local doctors. Parker’s famous nib grinders of 1939 made $2,400 a year. A typist at Parker would make $1,000 a year. (Other cool details she uncovered.)

Frank’s passports are works of art, colorfully illustrated with visas to scores of nations. More impressive than the stamps of many colors are the notes from customs officials. Chilling are the notes by Nazis and Italian fascists telling him where he can and cannot go. It also seemed to him at times that the Nazis had him under surveillance. As a former German citizen who became a naturalized American, he was suspicious to them.

As it turns out, they had good reasons to suspect him. He was very anti-fascism. After the outbreak of World War II, he worked with friends and family in Belgium to funnel money to the resistance fighting Nazi-occupation.

His post-war years were just as busy, as he rebuilt Parker’s global networks from the rubble of Europe’s and much of Asia’s destruction.

Check out the stamps from China to Nazi Germany on this heavily inked page from his 1937 passport.

Unfortunately, a life of travel and corporate empire building was rough at home. His first marriage, in which he had 3 children, ended in divorce. Later in life he remarried and had three more children, including Camy. Yet, that was difficult, too. He traveled around the world so much, a very, very young Camy thought he was one of America’s first astronauts for a little while.

In 1960, Parker opened a sales office in Paris, and Frank and his family were moved there to run the office until 1962.

By the mid-1960s, Frank’s memory started to fail. Very little was known about neurological diseases such as Alzheimers back then, and doctors actually thought his medical problems stemmed from diseases he might have picked up on his travels or from eating exotic native foods, such as, apparently, a still beating snake heart in Vietnam.

Frank retired as a vice president at Parker in 1966, after 38 years of dedicated service. He continued his hobby of collecting stamps and learning Russian and Sandskrit until his Alzheimers made it impossible. He passed away in 1974.

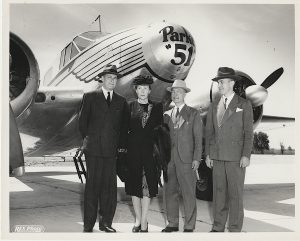
Frank is on the far right posing with the famed Parker 51 airplane. Among his many other hobbies, Frank was a licensed pilot, though I do not know if he flew the “51.”

Honestly, there are so many more adventures in Frank’s life, but I just couldn’t fit them all into this post without simply writing a book. I am so thankful for Camy’s reaching out to me and sharing her stories and research. I hope you enjoy learning a little more about Parker’s international growth and its star salesman and leader.

Have a wonderful Thanksgiving and holiday season. No matter how bad this pandemic gets, remember we are going to get through it. A vaccine is on its way. And one day, this pandemic will be nothing more than a bad memory. Thank you for visiting and supporting ThePenMarket.com. We can’t do it without you, and we are so grateful for you. Stay strong and keep writing.

Arkansas Pen Show or Bust!

Honestly, I haven’t even caught my breath from the Baltimore Pen Show, and now I’m heading out the door to attend the Arkansas Pen Show in Little Rock! Wowzers!

If you are anywhere within a few hundred miles of Little Rock this weekend (March 13 – 15), you have got to come out and see the Arkansas Pen Show. It is the biggest little pen show in the world! It is

A.) Hyperfriendly
B.) Very Well Organized
C.) Loaded with Amazing Vintage & Modern Writing Instruments & Ephemera
D.) Chocolate Bacon! Vanness Pens, who is the most famous ink seller online, hosts an after-hours party in its shop every year, and they always have a healthy supply of chocolate-dipped bacon. If you have never had such a delicacy, I can understand if you are skeptical. But, once you’ve had one bite, you will be addicted and a choco-bacon believer.
E.) Springtime! Every year I attend, flowers are blooming in Little Rock. Greenery is coming back to life. If you’re tired of winter, get your frozen butt down here to enjoy a little of what us northerners won’t see for another month or two.

As for pens, we’ve reloaded with dozens of new pens not yet available online. From vintage third-tier pens to Sheaffer TouchDowns and Snorkels to Parker Vacumatics to preowned luxury Waterman and Yard O Led, we’ve got tons to please pen lovers in the western portion of the American South.

I told you. I haven’t had a chance to catch my breath since the Baltimore Show. And Baltimore put on a fine pen show, indeed. This was my first year in attendance, and I was amazed by the organization, friendliness and crowds. Bert Oser and his crew put on a delightful event that was great for shaking off the winter rust as pen show season springs back to life.

Customers I’ve known for years but have never met in person came to say hi. We met a lot of new-to-us pen lovers. And it was great seeing so many younger, newer-to-collecting pen enthusiasts at the show. It was a blast introducing people to vintage pens, while learning about the tastes of more seasoned veterans in the world of pens.

Thanks to all those who made Baltimore so special, and I can’t wait to see y’all in Little Rock!

Still Hunting Parker Vac Desk Set Trumpet

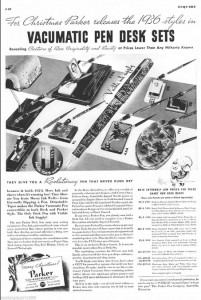
While searching for the perfect matching desk base trumpets for his special Parker Vacumatic and radio desk set, Jaime A. found this great ad from 1936. We love these classic Vac desk sets from Parker. The 1930s might have been a miserable time to live, with the economy in the tank, but, man, they had style.

Check out these great desk sets Parker was offering in 1936. Imagine stumbling on a pen shop back in the day with those looking minty fresh.

Check out these great desk sets Parker was offering in 1936. Imagine stumbling on a pen shop back in the day with those looking minty fresh.

Fun Pen Repair Help

Not too long ago we were approached by a radio restoration expert named Jaime A. for help on his special 1938 Detrola radio desk set. One of the two Parker Vacumatic trumpets had broken and he needed a replacement. We just so happened to be lucky enough to have a replacement trumpet set.

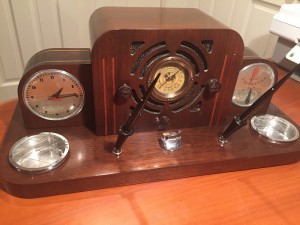
Photo shows a 1938 Parker Vacumatic desk set that features a clock, weather station and Detrola radio.

A fully restored Detrola radio makes up the centerpiece of this nearly perfect Parker 1938 desk set!

The set fits perfectly, but he wants to get one of the rarer chrome-based, ribbed trumpets to better match what originally came with the set. He also wants matching Parker Vacumatic desk pens (or a matching pen and pencil for such a desk set.). If you can help him out, please reach out to us in the comments, and we will hook you guys up.

In the meantime, feast your eyes on this set. Jaime completely refinished the wood and stain, replaced the vacuum tubes in the radio and got the clock and weather station portions working. That’s a lighter in the center of the wooden base!

If any body has a chrome-base and ribbed Parker Vacumatic trumpet they would like to sell, please let us know so we can help Jaime A. finish the final touches on his Detrol Radio and Parker Vacumatic desk set.

If any body has a chrome-base and ribbed Parker Vacumatic trumpet they would like to sell, please let us know so we can help Jaime A. finish the final touches on his Detrol Radio and Parker Vacumatic desk set.

Clearly, those Sheaffers are not the original pens for the set. They are just temporary place holders until he can find the right set of Vacs.

Still, it is one of the rarest and most handsome desk sets we’ve ever seen!

Painting A Parker Vacumatic Blue Diamond

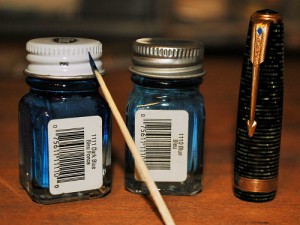
Use Testor's paints to fill in the blue diamond of your Parker Vacumatic clips. Some clips have old paint that tells how dark you should repaint it. Testor's 1111 Dark Blue paint is good for darker blue diamonds and 1110 is good for lighter blue diamonds. I used the 1110 Blue on the Vac Major you see in this photo. Also shown is a toothpick I use for the painting process.

Use Testors paints to fill in the blue diamond of your Parker Vacumatic clips. Some clips have old paint that tells how dark you should repaint it. Testors 1111 Dark Blue paint is good for darker blue diamonds and 1110 Blue is good for lighter blue diamonds. I used the 1110 Blue on the Vac Major you see in this photo. Also shown is a toothpick I use for the painting process.

You have successfully put a new diaphragm into your Parker Vacumatic. The celluloid and gold trim gleam from expert polishing. Now, how do you go about making the finishing touch and repainting the old blue diamond in the clip?

Some clips still have their enamel…or at least some of it. Most these days, do not have it.

Some purists say you should never paint in the blue diamond. Other experts say it is no big deal.

Me, I like finishing the look of the pen as close to factory fresh as I can make it. If you have an ultra rare model with partial paint, perhaps you should leave it as is. But for most of the working pens I deal with, fresh paint won’t effect the value.

The big trick is finding the right color paint to get the blue diamond as close to accurate as possible.

Having spent all of my teen years as an avid model airplane builder, I ran straight to the nearest hobby shop to turn to trusty Testors paints. I took a handful of clips with me and began comparing and contrasting the paint options.

That is when I noticed not all blue diamonds in the Parker Vacumatic clips were the same. Some were lighter and some were darker blue. I let the remnant paint/enamel in the old diamond guide me. I finally settled on two Testors blue paints from their myriad shades.

If you look on the bar code sticker on the back of the paint bottle, you will notice the name of the color and a number. That color number should be universal in any Testors paint display.

For the lighter blue diamonds, I found that the 1110 Blue by Testors is a near perfect match. The next shade darker  is the 1111 Dark Blue, which is a near perfect match for the darker blue diamonds. It sounds intuitive, but there are so many blues from which to pick.

Painting the diamond takes a steady hand and only a teeny-tiny amount paint. You can use a single-hair brush, but I find I prefer using a toothpick that I’ve whittled to an extra-fine point.

Dab in the paint until you have filled in the diamond. Use a magnifying glass to make sure you have filled in the corners. There is bound to be some spillage outside the raised lines of the diamond. I try to clean it up with the dry edges of the toothpick by rubbing a clean, dry edge of the toothpick along the edge of the diamond. If the paint gets down into the feathers of the arrow logo, a little paint thinner on a Q-tip can help get it out before it sets. Remember to make sure the Q-tip is not sopping wet with thinner, as spilling the thinner into the wet paint of the diamond can mess things up, too.

Best of luck on painting your diamonds blue!

Santa: Fickle Pen Collector or Genius Fundraiser?

Celebrity endorsements don’t come cheap, but it appears that Santa has been in high demand with every brand who has approached him over the years.

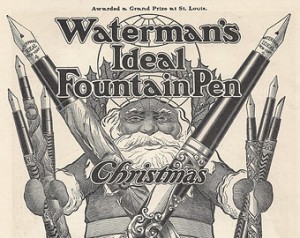
Santa makes a celebrity endorsement of Waterman pens in 1904.

Santa makes a celebrity endorsement of Waterman pens in 1904.

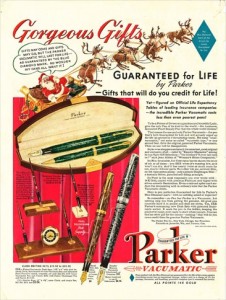
In 1904 he says Waterman is the best. In 1939 he was hooked on the Parker Vacumatic. In between those years, and well after, old St. Nick has been quick to shill for just about every major and minor pen maker in the world.

At first I thought I should chastise Father Christmas for his inability to pick a favorite vintage pen.

Then I got to thinking about the bigger picture. That’s when I realized what a bloody genius Santa truely is.

Santa has to deliver presents to all of the good boys and girls around the entire planet in just 24 hours. This year alone we’re looking at approximately 3 billion children. True, not all of them are good, but for now we’ll give most of them the benefit of any doubt.

Santa also cashes in on Parker Vacumatics. Could it be that St. Nick cashes in on all of these endorsement deals to raise the funds necessary to give more than 9 billion gifts every year?

Santa also cashes in on Parker Vacumatics. Could it be that St. Nick cashes in on all of these endorsement deals to raise the funds necessary to give more than 9 billion gifts every year?

In many cases, Santa delivers more than one toy per child. Even if we average it out to just 3 toys per child, that’s 9 billion toys.

That is more than a boatload of toys. Perhaps in a bygone era Santa could get away with 9 magic reindeer, but the jolly old elf will need rockets and more on his sleigh to cart that type of tonnage around the world. It wouldn’t be unreasonable to imagine such a modern sled as that runs up to $500 million or even $1B.

Even a living saint can’t magically generate enough cash for a rocket sled and 9 billion toys in one year…unless…

Unless he cashes in on his celebrity endorsements! By advertising every brand of every product imaginable, St. Nick could easily gin up trillions every year! Coca Cola alone has likely paid him hundreds of billions. Why else would a single bottle of Christmas Coke cost nearly $2?! A dollar of that must go to pay for Santa’s likeness on the bottle and packaging.

As inspired as Santa’s marketing and fundraising is, he can always use a little extra help from the rest of us.

To help the big guy out, it is not too late to visit Toys for Tots today and make a donation. Just click this Toys for Tots, and you will be directed straight to their donations web page.

Thank you, and have a Merry Christmas!

Pen Tip #1: Why Is My Favorite Nib Starting to Skip?

If you find that your favorite fountain pen won’t write any more or the nib is starting to skip and have trouble writing, it is quite possible your nib and inkfeed are clogging with old dried ink.

Soaking a fountain pen is often one of the fastest ways to help it write better. Just stick the nib in a cup of water, but not too deep--just enough to soak the nib and the inkfeed beneath it. This leaches out the old dried ink and helps to loosen the remaining ink inside the pen. Once the nib is clean, it likely will write as good as new.

Soaking a fountain pen is often one of the fastest ways to help it write better. Just stick the nib in a cup of water, but not too deep–just enough to soak the nib and the inkfeed beneath it. This leaches out the old dried ink and helps to loosen the remaining ink inside the pen. Once the nib is clean, it likely will write as good as new.

Infrequent use where you let your ink dry out inside the pen can often lead to clogged nibs and inkfeeds. Sometimes heavy use also leads to the same problem. If you fill and write your pen dry twice a week for years on end, the ink still builds up over time.

As a repairman, I find this is actually one of the most common problems pen users face. Whenever possible, I try to save my customers money with this simple advice.

Try to never let your pen dry out. If you know you won’t be using it for a while, empty it back into the inkwell or out in the sink. Of course, even constant use or careful emptying can lead to ink build up, eventually.

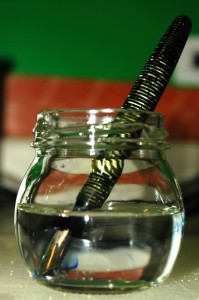
Always remember that room temperature tap water is your friend. (Hot and cold water can ruin your pen.) I find many repairs are easily avoided with a little H2O. Simply soak your pen overnight in a small cup or baby food jar, as in the photo. Don’t immerse the entire pen. Just soak the nib up to the section. The section is the part by which you most likely grip the pen. It is the black grip on this Parker Vacumatic. You can already see the old ink leaching off the nib.

After you let the pen soak for a few hours, the old ink remaining in the pen is softened. Empty out the container and fill it with more room temperature water. Then fill the pen with water several times, until the water is a uniform ink color. Empty and repeat until the pen starts running clear.

Empty the pen of water, and then shake out the remaining water over the sink. Be careful, that slightly tinted water sprays all over. Try your best to keep it in the sink. Wipe down the nib and inkfeed underneath with a paper towel. This helps drain out the last of the ink. I usually let the pen air dry for the remainder of the day. This way, when I refill the pen, the ink doesn’t seem watered down.