Tag Archives: pen restoration

How Do I Restore a Conklin Crescent

We are by no means done with the Decameron 2020 Project. However, I felt like getting back to pens for a posting. If you’ve been mostly coming for the storytelling, who knows, maybe you’ll get a kick out of a deeper dive into old fountain pens.

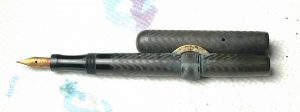
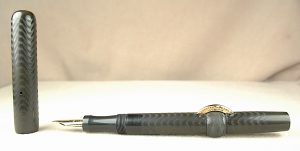
Here is a Conklin Crescent 2NL fountain pen in need of restoration.

Let’s look at one of the oldest “self-filling” fountain pen filling systems. In the earliest days of fillable fountain pens, any pen with a bladder or ink sac was considered self-filling. Before that you had dips and eyedroppers. Conklin invented the crescent filler in 1898. For as cumbersome as it looks, it was an insanely simple design. The pen is hollow like an eyedropper, but there is a rubber ink sac affixed to the nipple of the section. A crescent is fitted to a flat steel bar, and when the safety ring is rotated into the proper position, the crescent can be depressed, flattening the rubber ink sac within. The rubber ink sac wants to re-inflate, which fills the sac with ink and pushes the crescent back out of the barrel. Way less messy than an eyedropper, it was an instant hit. Even the famed American author Mark Twain was hired to be an advertising spokesman for the pen.
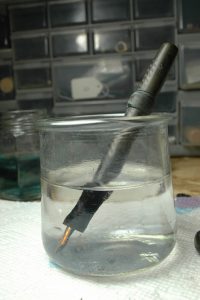
Don’t soak a Conklin hard rubber pen for very long, as it will discolor the old hard rubber. Be sure to get the water over the end of the section and on to the barrel threads.

If you already read our “How Do I Re-Sac a Vintage Pen” article, this isn’t very different. However, most of these pens are made from black hard rubber more than 100 years ago, and they are very brittle. You want to make sure you are pretty comfortable with restoring plastic/celluloid pens first. These early Conklins are getting much older and harder to find, and they break much more easily.

As with before, you will need some ink sacs, a pair of spark-plug/section pliers, a long dental pick, sac shellac or rubber cement, scissors that can cut through rubber ink sacs, a jar or cup, clean water, polish, a cloth rag, paper towels, a hairdryer, a razor blade and an ultra-sonic cleaner.

  1. Always start by soaking the nib in room temperature water over the threads of the barrel. Now the trick with old hard rubber is that water discolors it quickly. A shiny black will quickly turn to a chocolate brown haze. Don’t soak it for long, just enough to start to leech out old ink and maybe lubricate the friction fit of the section into the barrel. I certainly wouldn’t soak it for more than an hour. I’d probably soak it for much shorter a time.
  2. Next, remove the nib and section from the water and dry them off.
  3. Warm them up just a little with the hair dryer or heat gun. You only want them to be warm to the touch. Heat will also discolor the hard rubber. Plus, it can melt it.
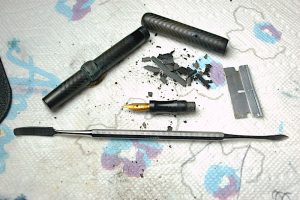
  4. Scrape the dead ink sac out of the barrel. Be sure to be especially careful shaving the ink sac remains off the section nipple.

    Using your section pliers, gently grip and twist the section counter clockwise in an unscrewing motion. Sometimes it takes nerves of steel, patience and experience to discern the difference between the old ink sac inside the pen cracking and the barrel of the pen cracking. If the barrel cracks, you’ve likely killed the pen and made it nothing more than a parts donor.

  5. Once you get the section to start coming out, gentle, small wiggles can work it out without further stressing it from twisting. Very small wiggles. You can easily break the barrel, especially when the section looks as if it is almost out of the barrel. The more the section wiggles, the more it can act as a lever to crack the barrel. Some people choose the give the nib and section a sonic cleaning and others don’t. The sonic action can destroy the part if there is a crack already starting in it. More than 30 seconds to a minute will start discoloring the rubber. However, I’ve also found that pens this old often are filled with sediment-based inks that need something special like a sonic cleaning to remove the caked-in old ink.
  6. After the section is out, the rest is fairly easy. Scrape out all of the old ink sac from inside the barrel and very gently shave off the remaining sac on the nipple. Your razor can easily cut the nipple or cave in a wall of the nipple. Go super slow and easy with only small motions.
  7. Polishing old hard rubber is difficult. You can wear away a lot of rubber very quickly, ruining imprints and chasing.

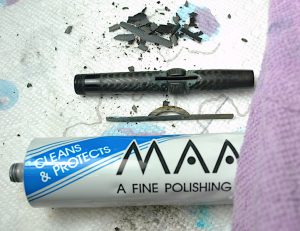
    With everything cleaned out and disassembled, that is when I like to polish the pen and parts. You cannot go as rough on century-old hard rubber as you can plastics. I like to use MAAS metal polish on a soft terry cloth rag. Mostly I just give a light going over of the pen and cap with the polish and rag because both strip away the top layers of the rubber and can remove chasing and other imprints. It also removes some of the chocolate hazing. Using a Q-tip, I also polish the nib and crescent.

  8. Reinstall the crescent filler and lock it in place with the safety ring.
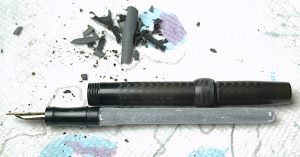
  9. Dust the ink sac in talcum power to help preserve it.

    Size and trim an ink sac that isn’t too snug inside the barrel. If you don’t have the crescent filler with the bar reinstalled first, you won’t get the proper fit.

  10. Use orange shellac to attach the sac to the section nipple.
  11. Dust the sac in pure talcum powder
  12. Very gently and slowly reinstall the sac and section into the barrel. This is another high-risk move that can crack the barrel so take it easy. You might even want to warm-up the barrel a bit.

Wait 24 hours for the shellac to dry before filling the pen. Then you are ready to write.

The finished pen should look much cleaner and be ready to write.

Baltimore Pen Show, Here We Come!

For the last several years, we have heard about the splendor of the Baltimore Pen Show. This is what we’ve heard: It is well organized by our buddy Bert Oser. It is a premier place to buy and sell premier luxury pens. It is well advertised to the public, and it is becoming the premier pen show in the country.

This year, we are going to experience it for ourselves to see if it is all true. We have spent the past month restoring dozens of vintage pens and prepping never-before-seen-on-our-site luxury pens.

PLUS, for showgoers, we have dropped some of our prices to clear out some of our luxury inventory.

On a personal level, this is my first trip to Baltimore. I bemoan the fact the Orioles aren’t yet playing, as I’d love to see a game at Camden Yards, but I hope to have some fun exploring the waterfront and old Fort McHenry, home of “The Star-Spangled Banner,” if there’s time.

And, of course, the very best part will be getting to hang out with old friends at a new location, while also making new friends at a show I’ve never seen before. Please be sure to come check it out and say, “Hi.”

How Do I Start Collecting Pens? Vintage vs. Modern

You can’t go wrong with vintage or modern pens. In either case, it is best to do a little research to know what to look for to get the best deal. It also helps to know if you intend to use or display them.

MODERN PENS

Most people who are new to collecting pens start with more modern pens, and this is a great place to start. When you buy new, you aren’t buying into any problems not covered by a warranty. Plus, you can frequently find less expensive pens that help you get acclimated to the hobby while satisfying your jones for awesome writing instruments. If you’re enjoying your TWSBIs, Kawecos, Heros and Lamys, just revel in the joy they bring and don’t let any pen snobs get you down.

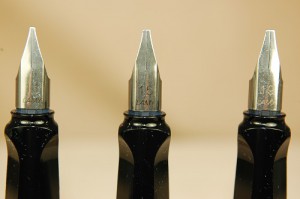
Lamy calligraphy nibs range in size from 1.1mm to 1.9mm. Each provides a distinctive nuance to you handwriting. The Lamy Joy fountain pen set is a great way to try all three sizes for fewer than $70.

The aforementioned brands are all great places to build up a daily-use collection on a budget, and you typically get great steel nibs with the Lamy pens and TWSBIs. Experiment with nib sizes and inks. The more you write with them, the better you will understand characteristics of fountain pens such as smoothness, feedback, flex, flow and the size grips (In more technical fountain pen parlance, the part you grip is usually called the section.)  that feel best.

Once the collecting bug has bitten, you might be tempted to branch out into vintage users, luxury users or vintage or luxury collectible pens. We will get to vintage in a minute, but for now we’re sticking to modern.

Like any car you buy brand new, the second you buy a brand new luxury pen, its price drops the when you bring it home. If you buy new, you get all of the joy of being the first to use the pen and are guaranteed it will be displayed without any damage. Yet, there is a great deal of money to be saved by purchasing luxury pens from Cross to Montblanc on the second-hand market.

To safely buy second-hand, it is best to have two checklists of things to investigate before spending your hard-earned money: the dealer and the pen.

As far as dealers go, check to see if they are established and reputable. Ask around on social media forums. Investigate the website. Check out their social media accounts and reviews. Is there a return policy? Do the descriptions honestly address damage and wear on the pens? Some pens might be perfect and listed as new old stock. But if a pen was clearly a daily user and is still described as absolutely flawless, get suspicious. Ask questions of the dealer. Most should get back to you within a day, unless they are traveling to a pen show. Feel free to ask for more photos. If you are buying from an auction site, never pay “buy it now” prices, as they are usually hyperinflated. Check the seller’s rating. If they have a few hundred or more sales with a 98% or higher approval rating, you’re probably pretty safe. Some bad vendors just keep creating countless new accounts to shed their old bad ratings. Don’t be afraid to buy from a brand new auction vendor, but don’t go crazy-high bidding. Also, especially on auction sites, set a budget for a pen. Even some fairly rare pens come up pretty often. Don’t be afraid to let them go until the right one comes along for your budget.

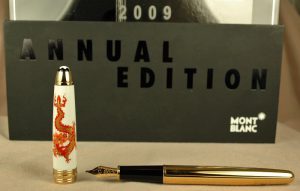
Montblanc pens are often authenticated by their serial number, “Pix” written under the clip and by coming complete with their box and papers.

If you are buying a pen as a user, make certain that the pen is in good working order. Get a good description for how the nib writes. If you are buying for display, make sure the pen is complete with minimal or acceptable wear. If you are at a store or pen show, ask to dip the nib and give the pen a scribble. Research ways to authenticate that the pen is not a fake. Most modern Montblanc pens since the mid-1990s have a serial number on the clip band, the word “Pix” in high relief under the clip and various models have other telltale signs of authenticity. For example: The black “precious resin” of the caps and barrels is really a translucent merlot red when held to sunlight or another strong light source. Most fakes of any brand also don’t have the original box and papers. Pens with boxes and papers typically carry a premium compared to ones that don’t.

VINTAGE PENS

Do not be daunted by the world of vintage pens. It is a ton of fun. Start slow. Get a feel for what you are doing. Do lots of research, and grow as you feel more and more comfortable. Unless you are independently wealthy, don’t start by spending $1,200 on a mandarin yellow Parker Duofold Senior that needs a complete overhaul. Start safely with a few fully restored $50 Parkers, Sheaffers or even Esterbrooks.

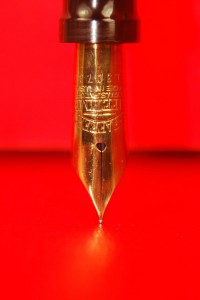
Sheaffer’s early nibs of the 1920s featured heart-shaped breather holes. Who says fountain pens aren’t romantic.

There are tons of great books and websites dedicated to vintage pens that can help point you in the right direction. Whether you want to restore, write or display, it won’t take long to get into the swing of vintage. Plus, most of these pens were designed specifically for daily use. Hardcore vintage pen lovers are convinced their nibs are better than most modern nibs. Plus the pens are more lightweight and designed not to let you cramp up during the writing of a long letter or journal entry.

Unless you are collecting for display, it is vital to know if the pen has been restored before you purchase it. Restored pens will cost more than unrestored, but there is no worse surprise than thinking you’re buying something that works only to discover it doesn’t. Even vintage new-old-stock pens might have some wear from rattling around a desk or drawer, so be sure to know what type of damage it has. Also find out about the pen’s nib? Is it original and/or in great working order? What size line does it write? When buying online this can be tough to gauge. The dealer might honestly find it is perfectly smooth because of the angle she or he writes, and you might write from a different angle that has feedback with the same nib.

If buying a vintage pen in person, always ask to see the pen before you pick it up. It is a very nice courtesy that saves dealers many broken or misplaced pens. When examining it, look it over closely for wear, discoloration and stains. Gently place the cap on your thumbnail and pretend to screw the pen on to your thumb. If there is a crack, your thumbnail will likely snag on it long before you can see it. Run your thumbnail over the threads of the barrel, too. Some cracks hide there, too. Ask to gently work the filler without ink to make sure it works. Again, ask to dip the nib to see how it writes. Try to get as close to your usual writing position as possible. Also check to see the strength of the barrel and/or cap imprints. Is there brass shining through the gold plate on the clip, cap band or lever?

PRICING

Comparison shopping is easier than ever in the age of the internet. Every site has its own pricing strategy, some offer better deals on certain pens than others. Follow pens on auctions sites to see what they are going for, too. You can even look up pens and check their “sold price.”

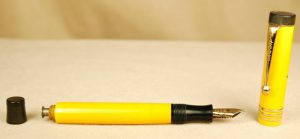
Mandarin Parker Duofolds are very fragile and rare. They are among the most expensive vintage Parker Duofolds.

If you see what look like two similar pens of drastically different prices, feel free to contact the vendor to ask why. Sometimes, subtle differences between pens can have huge effects on the price. One orange hard rubber senior Parker Duofold with two cap bands might look almost identical to the same pen in an early orange hard plastic, but their prices are going to be vastly different. (The old orange hard rubber is a lot rarer and more expensive.)


BUILDING RELATIONSHIPS

Dealers are not usually hard, cruel keepers of pens. We like getting to know our customers. Don’t be afraid to e-mail or call with questions. If you build a good relationship with a dealer, they are likely to keep a lookout for pens you want at better bargains…giving you the first option to buy. Who doesn’t love dibs on great pens before the rest of the public can see them?!

Make Your Own ‘J’ Pressure Bars

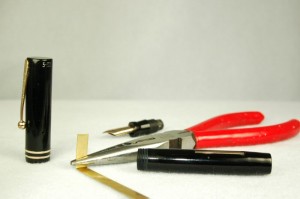
See how the needle nose pliers have started making a box in the end of the brass flashing as I restored this Sheaffer 5-30.

See how the needle nose pliers have started making a box in the end of the brass flashing as I restored this Sheaffer 5-30.

When I first learned the art of fountain pen restoration, there weren’t as many readily available modern replacement “J” pressure bars to fix most standard lever-filling vintage pens. You could try to scavenge J-bars, but they were so old and brittle, they were prone to breaking.

Fortunately, the man who taught me the art of pen repair was a master of improvising repair work. He taught me a lot about do-it-yourself repairs and engineering. As our goal was fully restored pens that worked as good as new, instead of featuring only all original parts, we had a lot of leeway.

Probably the best and cheapest trick he taught me was to fashion a J-bar out of brass flashing that sells for about a dollar a foot at your local hardware store.

Insert the new pressure bar J first, and make certain the length of the new spring is resting on the lever. Pulling out the new J-bar can risk damaging the lever-filler assembly, so try never to pull the new J-bar if possible.

Insert the new pressure bar J first, and make certain the length of the new spring is resting on the lever. Pulling out the new J-bar can risk damaging the lever-filler assembly, so try never to pull the new J-bar if possible.

I suppose you could use steel flashing, but brass has the advantage of not rusting. Either way, be sure to select a very thin piece that has a lot of flexibility. You will also need scissors that can cut it and a pair of needle nose pliers. Once you get everything together at your work bench, follow these steps.

1. Cut the flashing to be the same length as the barrel of the pen you are restoring.

2. Trim the edge of the flashing along its length to get it to fit in the pen barrel. Remember, keep it wide enough to be engaged by the pen’s lever. Some levers don’t push straight down. Some slip to either side. Make sure you cut the flashing so it is wide enough to accomodate this deviation.

3. Test the flashing by inserting it–still straight/unbent–into the barrel to see if it fits well and gives the lever enough space to manuver.

4. Slip the flashing back out of the barrel.

5. Using your needle nose pliers bend one end of the flashing into an arc. You will only want to bend the last 1/4 inch to 1/2. I like to bend the flashing into 2 90-degree angles. This makes a boxy J. It is perfectly fine to make an arched J.

6.  Test to make sure the J is just wide enough to slide into the barrel, while also providing enough resistance against the barrel walls to anchor it.

7. MOST IMPORTANT: Before final installation, remember to line up the J-bar J first into the barrel with the outside portion of the pressure bar against the lever.

8. Insert the new pressure bar assembly into the pen with your needle nose pliers. Push it all the way into the tail. Be careful not to push the pliers deeper than they are meant to go into the pen. They can easily split or shatter the barrel.

9. Insert the resac’d section, and make sure it all fits okay. If it doesn’t you can either trim down the sac or pull out the new J-bar with care and trim it to make room. *** It is important to note that many lever fillers have a pin or pin-ring that holds the lever in place. Pulling out the new J-bar can snap or ruin that thin piece of metal holding in the lever, and that is a lot harder to fix.

It is always best to make sure you got all of your cuts measured correctly the first time.

Your new J-bar will likely never be as effective as the old one, but it will fill your pen reasonably well. Plus it will also have saved you plenty in parts and labor. Believe it or not, you’ll feel a lot closer to your pen once you’ve restored its guts on your own.

Pen Tip #2: I Flushed My Pen. So Why Am I Still Getting Ink on My Hands?

A Q-tip can be one of your best tools for helping to clean out a pen cap and keeping your fingers from getting inky. Even after rinsing this Sheaffer Lifetime cap, you can still see plenty of ink on the cotton.

A Q-tip can be one of your best tools for helping to clean out a pen cap and keeping your fingers from getting inky. Even after rinsing this Sheaffer Lifetime cap, you can still see plenty of ink on the cotton.

Periodically flushing your pen with water often helps eliminate leaks as well as helping to get your nib to start writing well, again, as we discussed in Pen Tip #1.

Nevertheless, after you’ve gotten your pen cleaned and filled, you notice that you still have a little or a lot of ink on your fingers the next morning after you’ve decided to write with it.

The trouble often comes from old ink still inside your cap. Even if you rinsed your cap when you flushed your pen, that is not usually nearly enough to get all the old ink out.

Inside the caps of nearly all vintage and modern pens is an inner cap. It usually seals the nib compartment of your cap when the section (writing grip) of your pen screws up and against it. This keeps your pen from drying out. However, as fountain pens are wont to occasionally leak, drip or see some evaporation with heat, ink gets into these inner caps. Worse, it gets between your inner cap and outer cap shell. Once enough accumulates, your fingers are bound to get inked.

Your best bet is to soak your cap overnight in room temperature water.

Are you sensing a theme? Room temperature water and soakings are our friend.

Make sure the whole cap is immersed, and make sure that there is no air trapped inside the cap.

After a good, long soak, shake the cap empty over a sink. This gets messy in a hurry, so be careful.

Your next move is to hold the cap under running room-temperature water from the tap while scrubbing its insides with a small plastic-brissle brush that is like a toothbrush but smaller. Some hardware stores, tobacco shops and gun shops sell ones that work pretty well. I often use a plastic-brissle brush I found in an air rifle cleaning kit. I don’t have an air rifle to clean, but I spent the money just to get that little brush used on the air rifle barrels. Whatever you do, do not use a metal-wire brush used on regular hand guns and rifles. It will tear apart your cap.

Once the ink stops coming out of the cap in the sink, shake out the cap again. Use a Q-tip to dry out the cap. Odds are good that there is still plenty of ink in the cap, and you will go through many Q-tips trying to clean it out. You will have to keep getting Q-tips wet to keep getting the old gunk out. Pay special attention to the cap threads and the lip of the inner cap. Keep cleaning until you are satisfied.

This process takes a while, but if you only have one or two pens you have to do this for, it is worth just doing this to them once every several years. If you are a hardcore collector, we can discuss inner cap pullers and ultrasonic cleaners on another day.

Click here to see the finished restoration of the Sheaffer Lifetime cap in the photo above.

Please write in with your pen repair questions.

Parker 21, Parker 45 & Esterbrook Fountain Pens

If you have been visiting our vintage pens pages lately, you might find yourself asking, “Self, what’s with all of the cheap Parkers and Esterbrooks?”

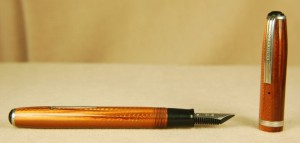
We sell more vintage Esterbrook pens than any other brand. These copper-colored Esterbrooks are my personal favorite of the options available, but our most popular colors are blue, grey and black.

We sell more vintage Esterbrook pens than any other brand. These copper-colored Esterbrooks are my personal favorite of the options available, but our most popular colors are blue, grey and black.

It is simple enough my friends. Esterbrooks are the most popular pens we sell at ThePenMarket.com. We generally can’t keep them in stock. As for the inexpensive Parkers, we had so many expensive pens on the vintage pens pages, we thought it would be nice to offer a high-quality entry pen to the site for people just looking to get into writing with fountain pens.

But then there is one more reason.

ThePenMarket.com recently acquired an amazing collection of rarer, harder to find vintage pens dating back to the turn of the last century. We’re talking hard rubber and silver filigree fountain pens. Think Waterman 12, Waterman 52, Waterman 54 and a beautiful sterling silver Waterman 452. We’ve got Parker Duofolds and Vacs. Sheaffer Lifetimes and Balances. Maybe some Mabie Todd. Perhaps some sterling and gold no names. You’ll quiver with delight at the senior Conklin Enduras with remarkable color clarity.

We’ve got 120 classic vintage pens to catalog, restore and post for sale.

Are you salivating yet? When they arrive online would you rather they be the first things you see or have them buried under 2 dozen steel nib beauties. That’s what we thought. In the coming weeks and months, e-fist fights might breakout over the first daily opportunity to buy these glorious fountain pen wonders of yesteryear.