

J-Pressure Bar Repair Update

A friend and reader of “Drippy Musings” named Harv S. from Palatine, IL, reached out to me this past May to thank me for last November’s piece about making your own J-springs (pressure bars) at home.
Not only did he find the article helpful, he shared with me his own modification to duplicate the action of other pressure bars with an extra “leg” that helps to squeeze out a few extra drops of ink. Below are his photo and advice.
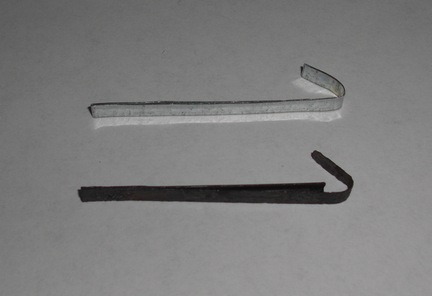
Reader Harv S. from Palatine, IL, showed us not only the J-spring pressure bar he made after reading our column, he gives his own advice for adding a second leg to the spring to make it perform like some other vintage J-springs.
“Here’s a picture of the original, weakened, corroded spring and the one I made to replace it. I couldn’t find brass flashing material so I went with galvanized steel, which should be fairly resistant to rusting though not so much as non-ferrous metal, agreed. Although the picture doesn’t show it well, I folded over the material so that there’s a secondary leg of the spring just like the original riveted one. I have some diamond grit files that I de-burred the new spring with and it seems to work well.” — Harv S.
What I love about the fountain pen community is how much we help each other out with this hobby and occassional obsession.
Thank you, Harv. I look forward to seeing more of your’s and other reader’s projects. Please let me know how I can help.
No comments found for Post ID: 21399